• Welcome Visitor! Please take a few seconds and Register for our forum. Even if you don't want to post, you can still 'Like' and react to posts.

One more 2wd 98 coil spring 5.0 swap.


Jbrown1238

Member
Joined
Sep 3, 2010
Messages
691
Reaction score
6
Points
18
Location
Largo, Fl
Vehicle Year
2003
Make / Model
Ford
Engine Size
306
Transmission
Manual
My credo
None
very nice built....if you haven't done your drive shaft, I like to share my build.
I use one from 2000 2wd v8 explorer just change yoke with the one from my 99 ranger and fit perfect.
Thank you for the heads up and the kind words. I did some preliminary measurements and it looked like the 99 3.0 V6 automatic regular cab Ranger drive shaft was a little short. However the one from my second truck, a 98 2.5L manual trans regular cab Ranger looked very close to the right length. I have a yoke from a 93 cobra that I plan to use but have not matched it to the driver shaft yet.


Lil-Pony

Active Member
TRS Banner 2012-2015
Joined
Nov 6, 2012
Messages
1,085
Reaction score
5
Points
38
Age
30
Location
San Antonio, TX
Vehicle Year
1984
Make / Model
Take a Guess
Engine Size
2.8 soon to be 4bt
Transmission
Automatic
Ive started to work on the wiring harness and flashbacks have begun to occur. I have a 2000 explorer harness and ecm should i grab a 98 ecm and harness or will the earlier ecm work on the 2000 explorer harness.


Sent from outer space.
 

Mac

Well-Known Member
Supporting Member
V8 Engine Swap
Joined
Aug 9, 2007
Messages
5,103
Reaction score
183
Points
63
Age
77
Location
C. Wisconsin
Vehicle Year
2003
2000
199
Make / Model
Ford
Engine Size
4.0
Transmission
Manual
If you have the 2000 ECM and harness why go to the '98'? The ECM pin-outs are the same but different coded computers and the cam sensors are different.
Dave
 

Jbrown1238

Member
Joined
Sep 3, 2010
Messages
691
Reaction score
6
Points
18
Location
Largo, Fl
Vehicle Year
2003
Make / Model
Ford
Engine Size
306
Transmission
Manual
My credo
None
Thats what i planned on doing.... Anyway thanks for all the info and solving my small issue next is all the fun of matting a 98 harness to a 2000 ecm. Threadjack over for now
That I don't know. I used a 2001 ECM and harness matched to a 99 3.0L Ranger.
 

Lil-Pony

Active Member
TRS Banner 2012-2015
Joined
Nov 6, 2012
Messages
1,085
Reaction score
5
Points
38
Age
30
Location
San Antonio, TX
Vehicle Year
1984
Make / Model
Take a Guess
Engine Size
2.8 soon to be 4bt
Transmission
Automatic
That I don't know. I used a 2001 ECM and harness matched to a 99 3.0L Ranger.

Yah but you and i both have the pats less 98 ranger??? But if the cam sensor is different for the patless explorer. Ill just stick with the 2001 ecm i have. Ill just have to tune out the pats while im having my tune for my cam made.


Sent from outer space.
 

Jbrown1238

Member
Joined
Sep 3, 2010
Messages
691
Reaction score
6
Points
18
Location
Largo, Fl
Vehicle Year
2003
Make / Model
Ford
Engine Size
306
Transmission
Manual
My credo
None
Yah but you and i both have the pats less 98 ranger??? But if the cam sensor is different for the patless explorer. Ill just stick with the 2001 ecm i have. Ill just have to tune out the pats while im having my tune for my cam made.


Sent from outer space.
I do have the PATS in the 99 3.0L Ranger I am using but plan to disable it with the SCT Tuner. When I first started the thread I did plan on using my 98 Ranger but decided to buy a second truck, a 99 model.
 

Lil-Pony

Active Member
TRS Banner 2012-2015
Joined
Nov 6, 2012
Messages
1,085
Reaction score
5
Points
38
Age
30
Location
San Antonio, TX
Vehicle Year
1984
Make / Model
Take a Guess
Engine Size
2.8 soon to be 4bt
Transmission
Automatic
Cool, well after an hoir of fliping thought the evtms it looks like i should have fire by just disabling the pats


Sent from outer space.
 

Jbrown1238

Member
Joined
Sep 3, 2010
Messages
691
Reaction score
6
Points
18
Location
Largo, Fl
Vehicle Year
2003
Make / Model
Ford
Engine Size
306
Transmission
Manual
My credo
None
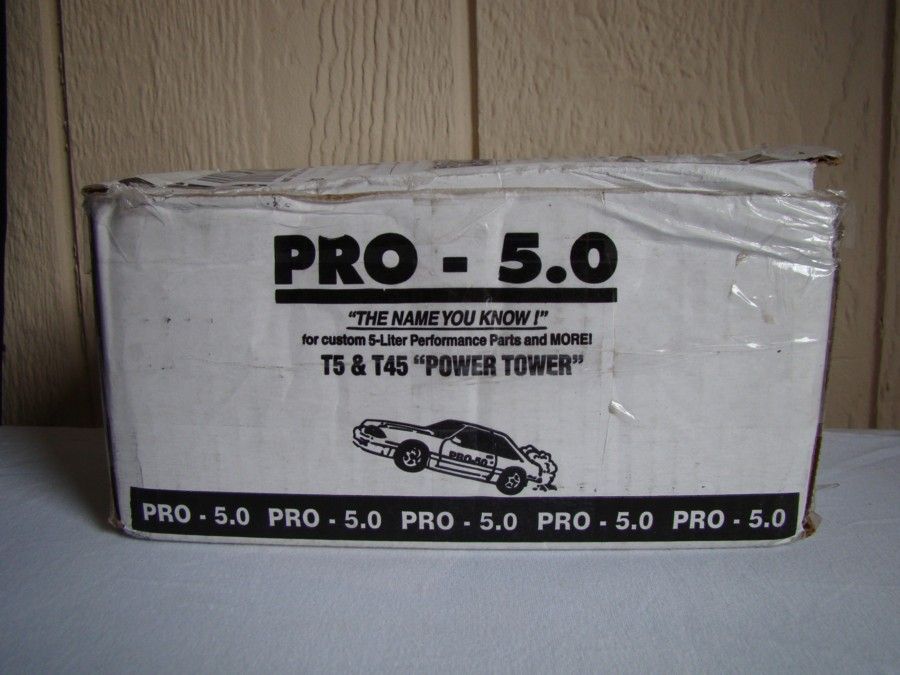
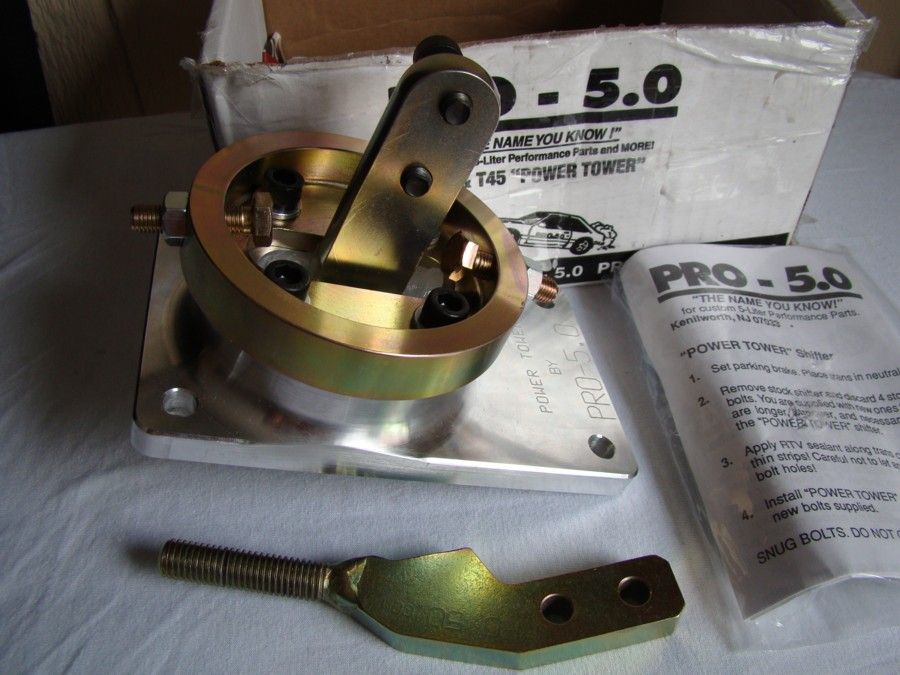
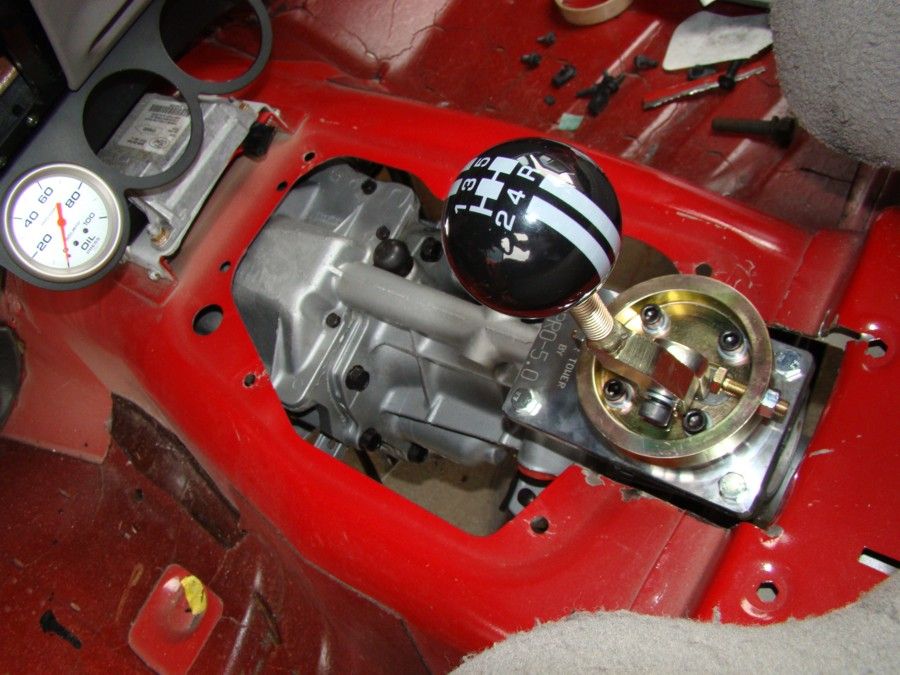
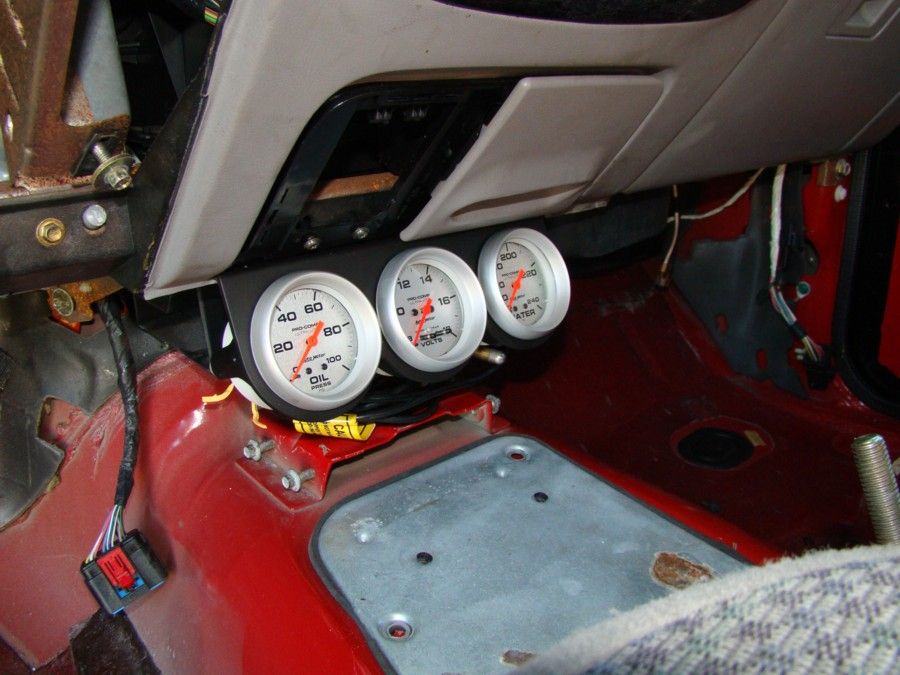
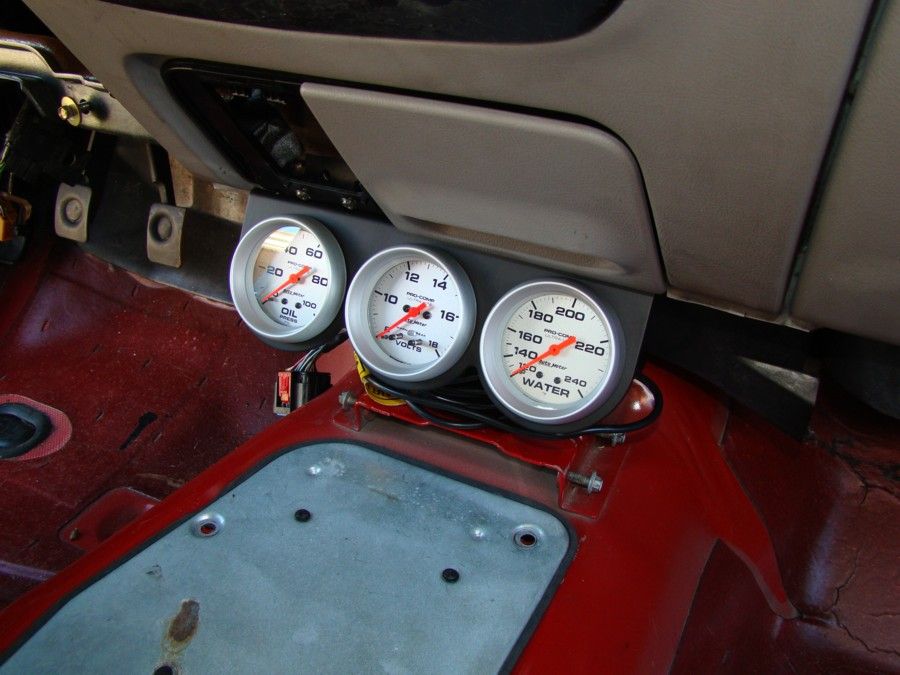
The new parts are still trickling in every few days. The PRO 5.0 shifter arrived along with the black and grey shift knob and the Autometer gauge pod. I also picked up a 2 5/8 inch Oil Pressure gauge from a local supplier to test fit the clearance against the Airbag module on the trans tunnel. It looks like this piece will need to be relocated in order to install the three Autometer gauges I would like to use.


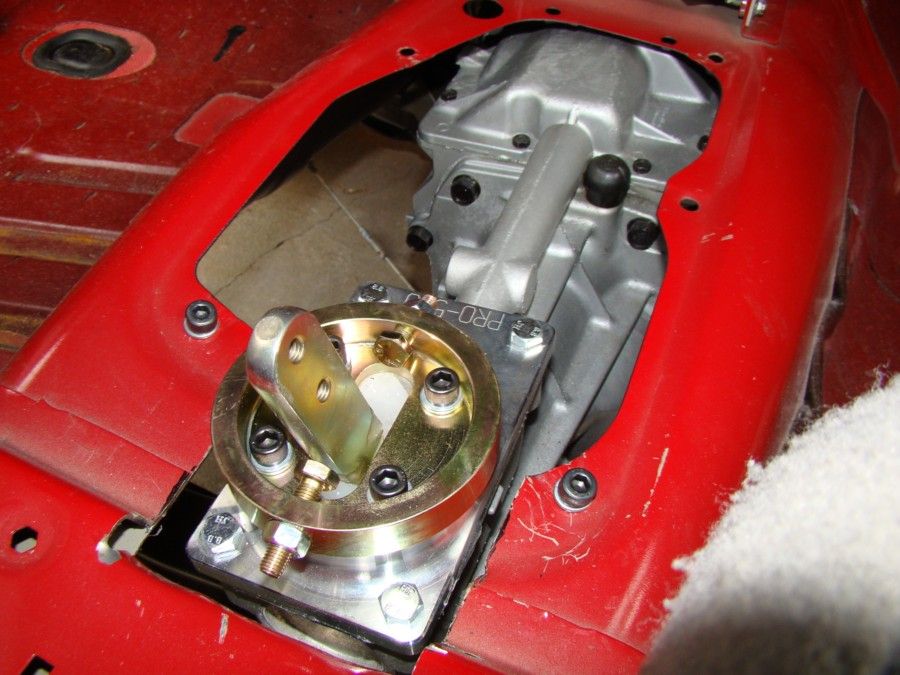
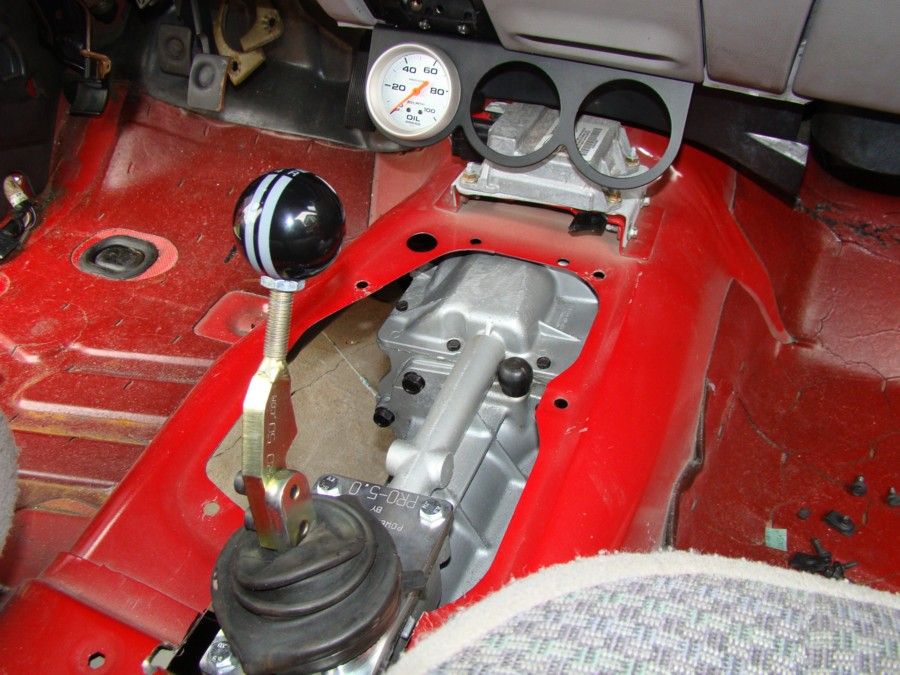
The PRO 5.0 shifter fit right into place and looked like it was made for the Ranger.


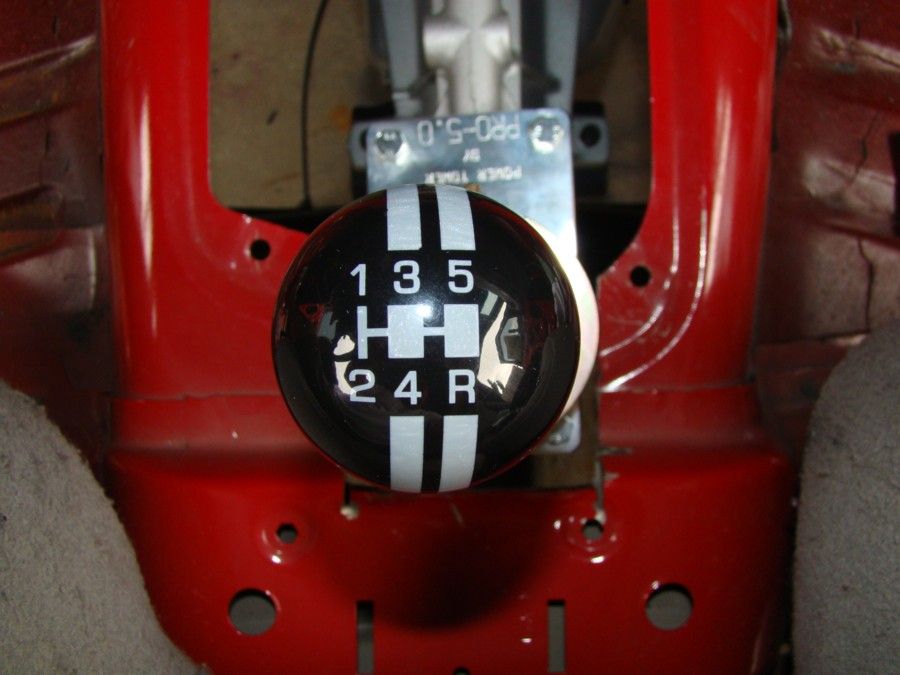
Now with the shift knob installed.


Chris Neighbors from Neighbors Industries, who did the front Cobra brakes for this truck, is designing and crafting me a shift lever that will bring the shift knob up and back into a comfortable position.


The rubber boot that came with the shifter that was on the World Class T5 fit the PRO 5.0 shifter well and was transferred over to help seal the new piece.

 
Last edited:

Jbrown1238

Member
Joined
Sep 3, 2010
Messages
691
Reaction score
6
Points
18
Location
Largo, Fl
Vehicle Year
2003
Make / Model
Ford
Engine Size
306
Transmission
Manual
My credo
None
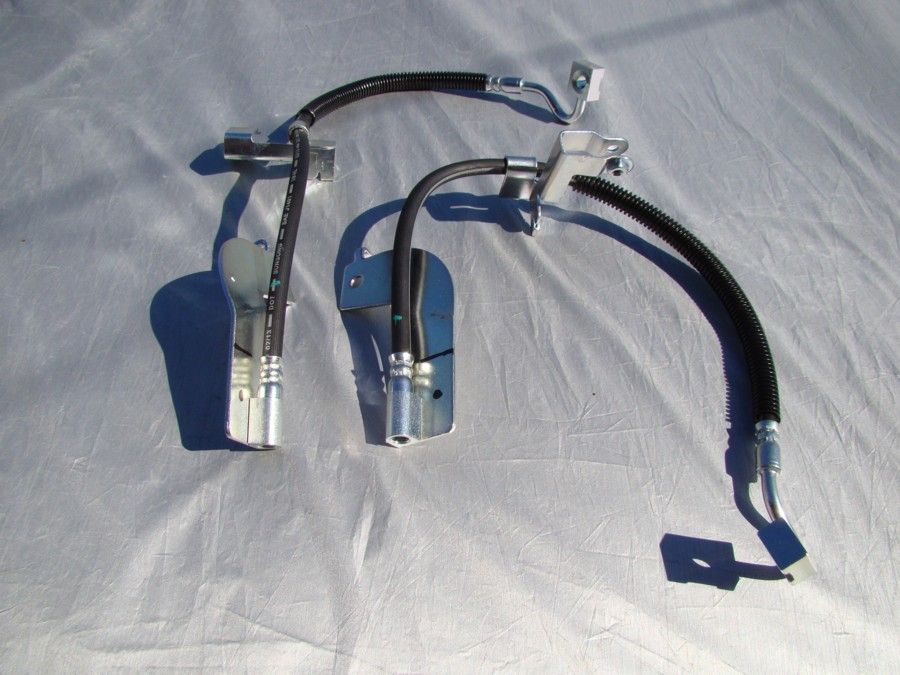
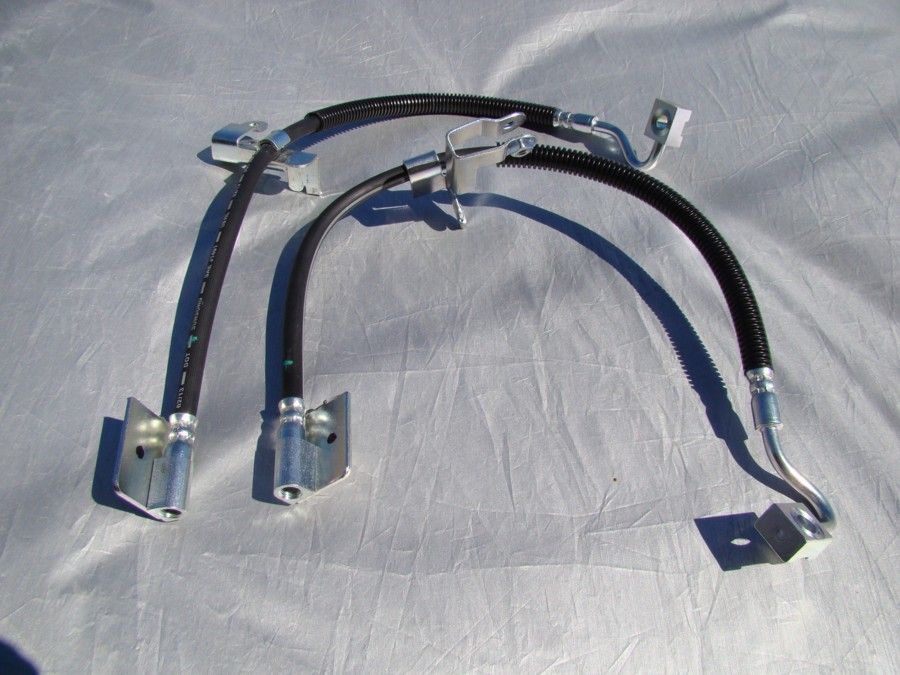
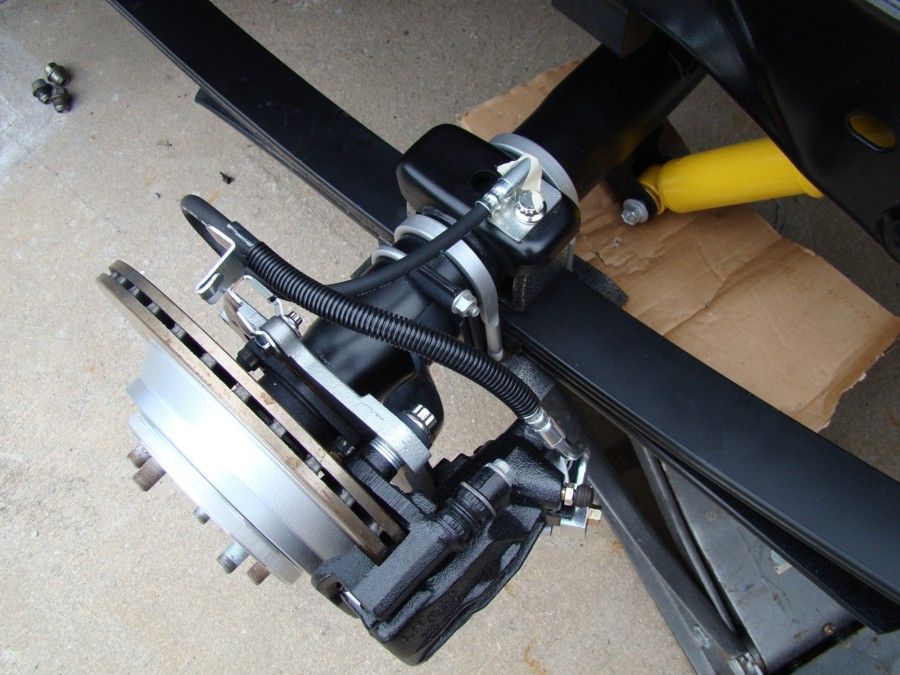
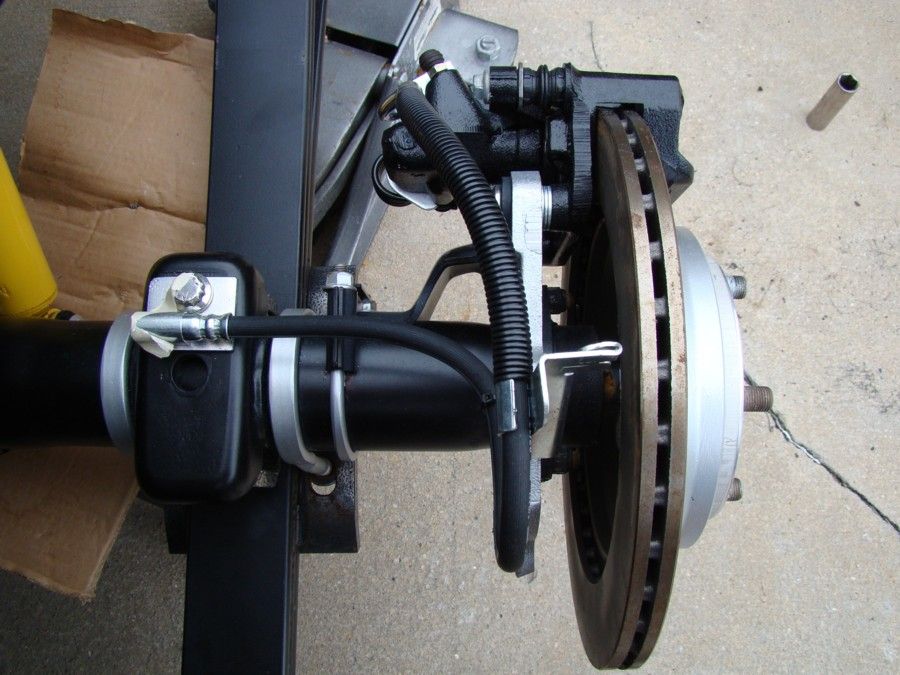
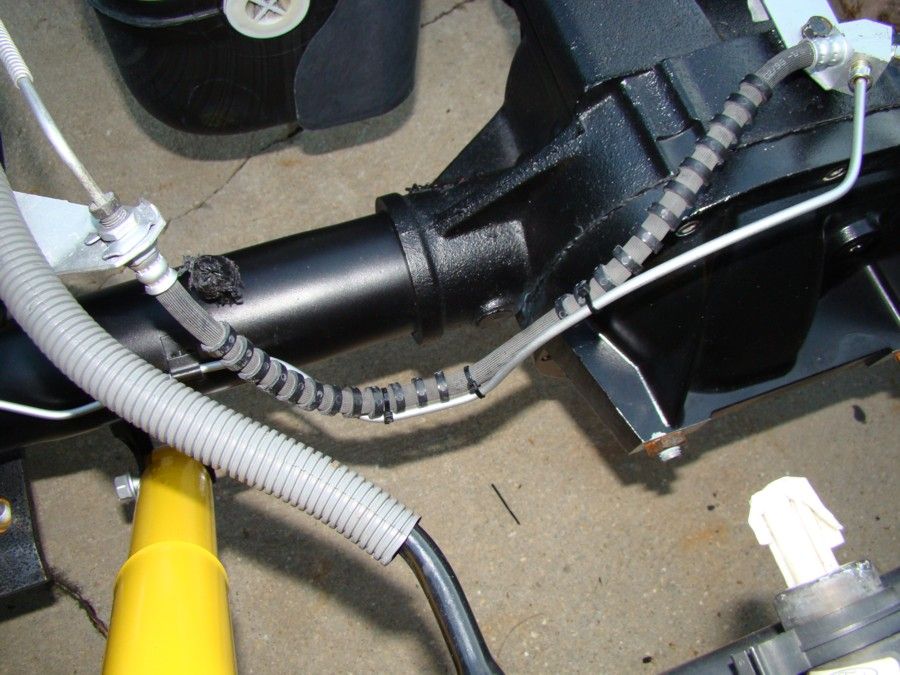
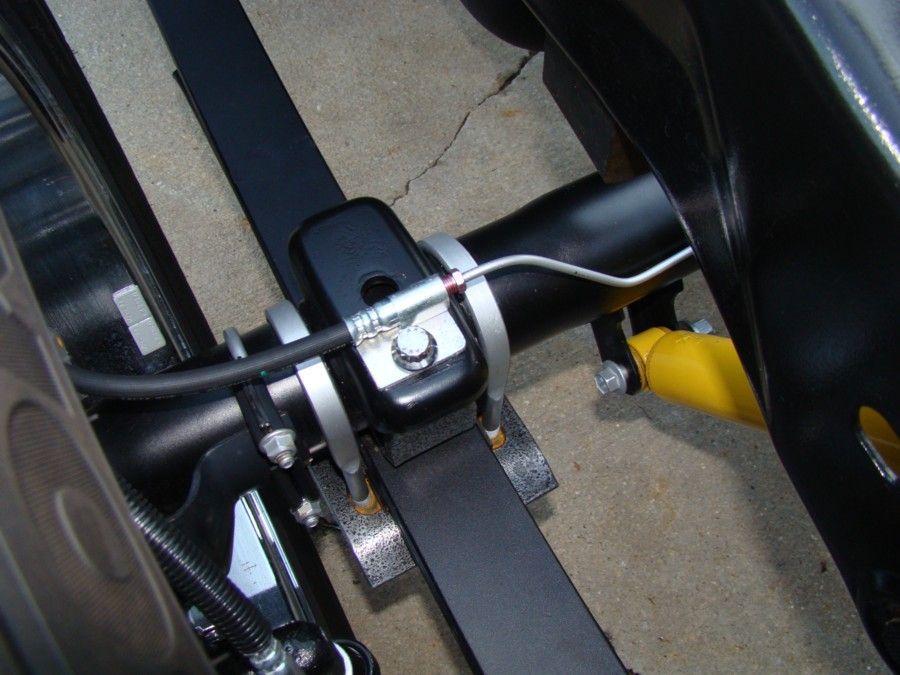
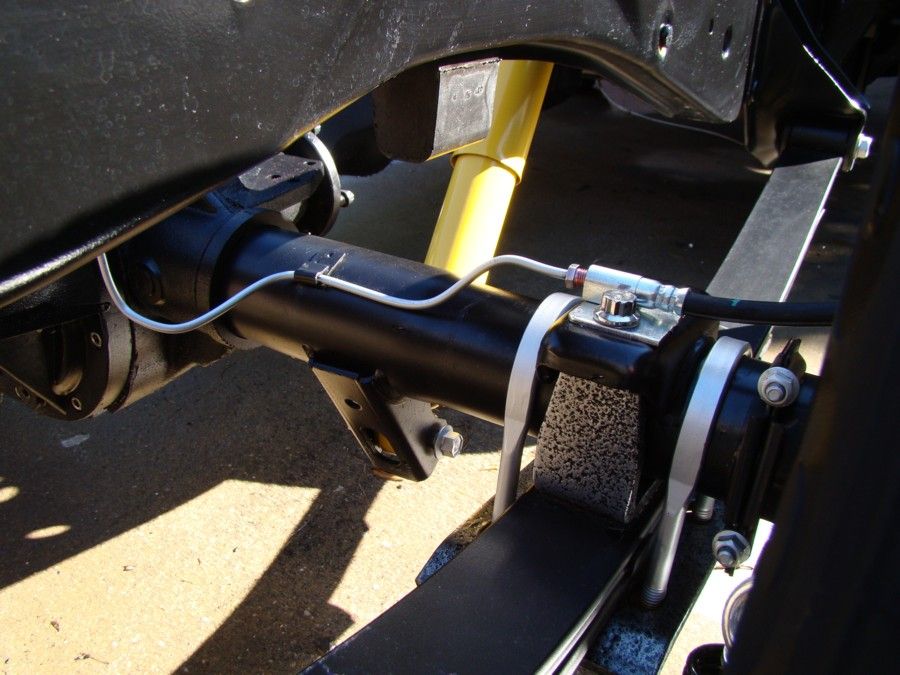
My son and I tackled the rear brake lines earlier this week. We started with the soft lines going to the rear Cobra calipers first. After a few trials and errors we decided on the lines for a 2003 Cobra fit the best. With a couple slight modifications to the large brackets the lines were ready to be installed.

I marked where the cuts would be made and knocked off the excess bracket material before drilling a mounting hole in the portion that remained.


The small in line bracket allowed the soft lines to be bolted to the caliper bracket like they were made to fit. The larger bracket was bolted directly to the spring pad on the flipped rear end housing. I know the ARP fastener is a little larger than needed for this application but I wanted to use the existing hole in the spring pad. I just tapped the hole as needed and run the fastener straight into the pad.


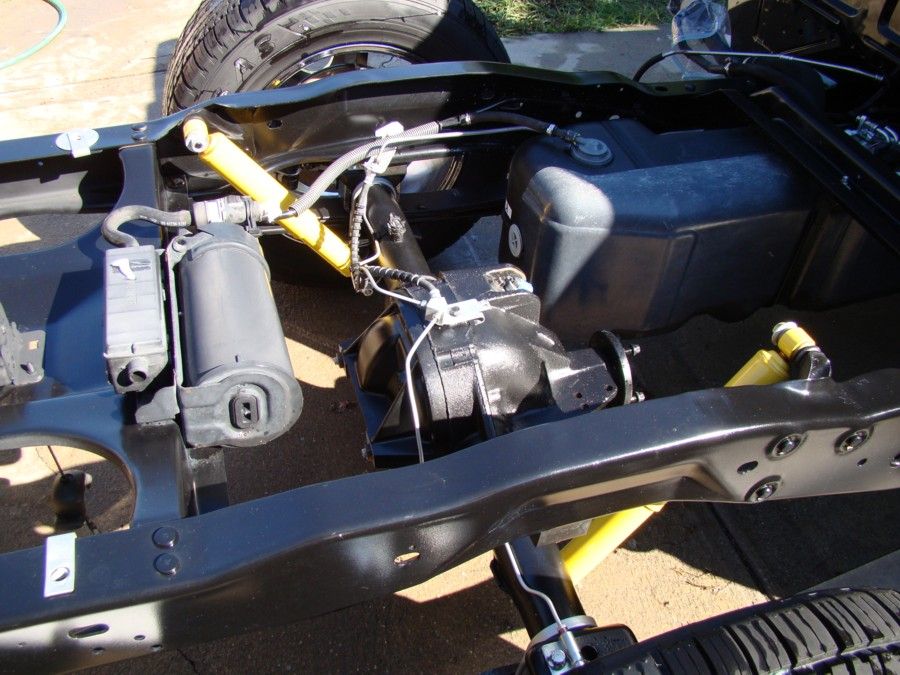
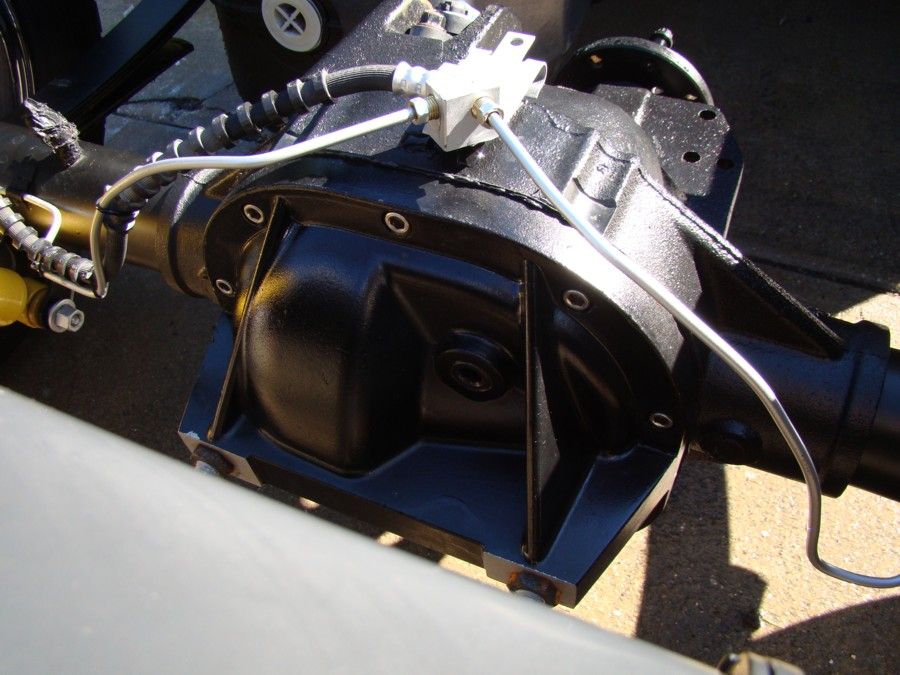
My son fabricated hard lines to fit the Ranger 8.8 housing and to meet the soft 03 Cobra lines at each end. He left plenty of room to service the differential and bent the lines so the U-bolts for the sway bar would clear.


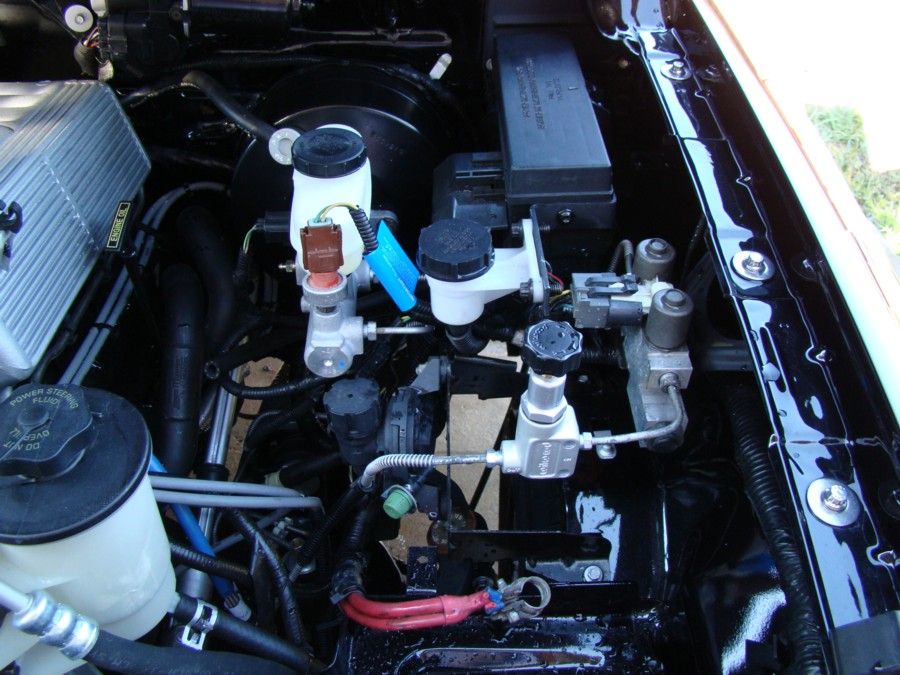
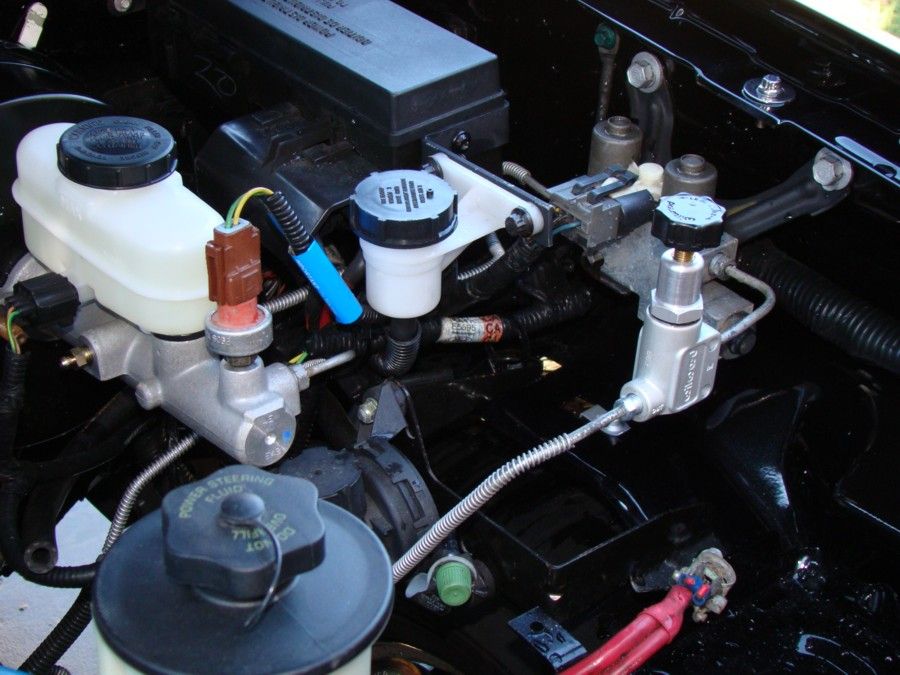
Then we moved up front and installed the adjustable Wilwood proportioning valve. I had not planned on using one of these but a few forum members and my son convinced me it really would be necessary. I still need to fab a bracket to hold it securely in place.


After the proportioning valve was installed we loaded the system with new brake fluid and bled the master cylinder and all four corners. It feels good to have the brake system completed.

I am still sorting out the gauge pod and interior trim in that area. The ash tray will stay but the passenger air bag key switch obstructed the view of the oil pressure gauge and needed to be moved.


Jbrown1238

Member
Joined
Sep 3, 2010
Messages
691
Reaction score
6
Points
18
Location
Largo, Fl
Vehicle Year
2003
Make / Model
Ford
Engine Size
306
Transmission
Manual
My credo
None
I don't have any new pictures at the moment but I thought I would share a few updates since it has been a while. After finishing the brake system I attached the brake switch and wiring pigtail to the brake pedal. I attached the clutch master cylinder pushrod assembly, the safety switch, and the wiring harness. Even though this truck was an automatic from the factory the clutch pedal wiring pigtail was tucked up in the dash and complete. I filled the clutch system with fluid but I am still bleeding the remaining air from the master cylinder and lines. I installed the throttle cable, it sure is nice with all three pedals tight and ready to go!

I moved on to the chassis harness from the cab back to the rear of the truck and pressed all the clips into there original location. I went back and permanently attached the starter wiring to the starter and tagged the wiring from the 2001 Explorer battery harness so it is ready to be soldered to the male 12 pin plug tomorrow. AC high pressure switch, AC Compressor, and starter solenoid will all be included in this 12 pin connection. The oil pressure sending unit wire will be pulled aside and will run through another circuit on the Ranger side of the 42 pin connector.

If all goes well I will complete the soldering on the battery harness and go ahead and install the new Walbro 190 LPH fuel pump tomorrow morning. I will be sure to collect a few new photos and catch up on some of the latest updates.
 
Last edited:

gsp

New Member
Joined
Sep 14, 2010
Messages
217
Reaction score
1
Points
0
Vehicle Year
1993
Make / Model
Ranger
Transmission
Manual

oddball101

New Member
Joined
Jun 8, 2010
Messages
138
Reaction score
0
Points
0
Location
Columbia SC
Vehicle Year
01
Make / Model
Ranger
Engine Size
5.0
Transmission
Automatic
I just caught up with your build reading a years worth of updates. You have really impressed a lot of people here with your quality of work to say the least. I had the same issue with the connector but instead of soldering in, I just re-pinned the male connector with the proper wires. I got all excited reading when Bob jumped on to help you out. He and RangerSVT helped me through that part and several others as well (much thanks, gents!!). The battery harness was the most confusing part for me, but I was able to get it resolved. As for me, I am meeting with people tonight to see about getting an upper manifold fabricated to mount the blower now that I have most the kinks out of the system :] Do you have a name for her yet?? She sure is perty..

Your truck could be the centerpiece in a church..
 

Jbrown1238

Member
Joined
Sep 3, 2010
Messages
691
Reaction score
6
Points
18
Location
Largo, Fl
Vehicle Year
2003
Make / Model
Ford
Engine Size
306
Transmission
Manual
My credo
None
I just caught up with your build reading a years worth of updates. You have really impressed a lot of people here with your quality of work to say the least. I had the same issue with the connector but instead of soldering in, I just re-pinned the male connector with the proper wires. I got all excited reading when Bob jumped on to help you out. He and RangerSVT helped me through that part and several others as well (much thanks, gents!!). The battery harness was the most confusing part for me, but I was able to get it resolved. As for me, I am meeting with people tonight to see about getting an upper manifold fabricated to mount the blower now that I have most the kinks out of the system :] Do you have a name for her yet?? She sure is perty..

Your truck could be the centerpiece in a church..
Thank you very much for the kind words. I had to laugh at myself when I read your comments about soldering the connector and how you just repinned yours. Rwenzing mentioned earlier how he had to change the shell on one of his. What caused me to laugh is that I never though of something so simple as changing out the pins or changing out the connector shell. After I soldered mine I understood what you and Rwenzing meant and how easy it was. Too bad it didn't click with me prior to the extra work. You are right, they are Great! Both have always been a stones throw away with all the answers I need.

I have not named "her" yet. Not sure what type of a personality "she" will have with the new face lift.

Nice to hear about the upper and the blower! I sure miss that part of the 03 Cobra. Nothing like the boost!
 
Last edited:

oddball101

New Member
Joined
Jun 8, 2010
Messages
138
Reaction score
0
Points
0
Location
Columbia SC
Vehicle Year
01
Make / Model
Ranger
Engine Size
5.0
Transmission
Automatic
One thing I am having an issue with is how I did the battery terminal connections from the wire harness and perhaps you can give me some insight. I took some autozone connectors (the kind that crimp on the wire and have a loop on the top), crimped them onto the battery harness and then took a blow torch to it and fed solder indie of the gap until the cavity between the wire and the connector filled completely. Lol, I just wanted to be thorough.. but I think it is causing issues as my battery terminals corrode just about every other day now, and that is with using the anti corrode stuff. When you did yours, how did you set up your harness terminal connections, did you just crimp them on there with no problem?
 

Jbrown1238

Member
Joined
Sep 3, 2010
Messages
691
Reaction score
6
Points
18
Location
Largo, Fl
Vehicle Year
2003
Make / Model
Ford
Engine Size
306
Transmission
Manual
My credo
None
One thing I am having an issue with is how I did the battery terminal connections from the wire harness and perhaps you can give me some insight. I took some autozone connectors (the kind that crimp on the wire and have a loop on the top), crimped them onto the battery harness and then took a blow torch to it and fed solder indie of the gap until the cavity between the wire and the connector filled completely. Lol, I just wanted to be thorough.. but I think it is causing issues as my battery terminals corrode just about every other day now, and that is with using the anti corrode stuff. When you did yours, how did you set up your harness terminal connections, did you just crimp them on there with no problem?
I plan to use the same style set up as you did but just tighten the clamps down on the connection and leave it at that. I understand why you did what you did and it is probably a good idea. But the extreme heat may have caused the issue.
 

Sponsored Ad


Sponsored Ad

Staff online

Today's birthdays

Member & Vendor Upgrades

For a small yearly donation, you can support this forum and receive a 'Supporting Member' banner, or become a 'Supporting Vendor' and promote your products here. Click the banner to find out how.

Latest posts

Truck of The Month


Shran
April Truck of The Month

Recently Featured

Want to see your truck here? Share your photos and details in the forum.

Follow TRS On Instagram

TRS Events

25th Anniversary Sponsors

Check Out The TRS Store


Sponsored Ad


Sponsored Ad

Sponsored Ad


Amazon Deals

Top