• Welcome Visitor! Please take a few seconds and Register for our forum. Even if you don't want to post, you can still 'Like' and react to posts.

Basic 93 ranger with sentimental value - thanks for all the help


Casual_Reader

New Member
Joined
Sep 2, 2015
Messages
30
Reaction score
1
Points
0
Vehicle Year
93
Make / Model
Ford
Transmission
Manual
long time lurker...

I wanted to post a YUGE thanks to the contributors... rather than bumping necro threads that addressed the issues I was facing at the time.

Collectively, you guys have helped me through taking the whole front end off to replace the radiator support... a few days of fun. Obviously I'm up north in the rust belt. Those cheap spot weld hole cutters from harbor freight worked wonders when using dawn dish detergent as the cutting oil... the teeth weren't dulled at all after 40 <?> something holes cut. The mounting holes in the brackets were also rusted out... with no welder, my shade tree solution was big washers and polyurethane glue. A couple years later - they're as strong as the day I glued them in place - no cracking or other signs of stress.

Having the whole front end off is also the perfect time to replace the timing belt... which was loose and flopping around a bit against the cover. Posts here and youtube vids were invaluable. The shop labor charges on that alone were... well, you know... it's a 25 year old truck.

Leaf spring brackets and shackles... Did I mention I'm up north? What a pain... no one around here would touch it. Grind off the rivets... the tough part was burning out and replacing the bushings without a press. Threaded rod and old washers and lawn mower blades (believe it or not) got them in.

The driver side cab mount bracket has since broken loose... that's next. Odd... all the other cab mounts are fine. Meanwhile, squeaks a bit on right turns.

Simple fuel pump replacement... I was lucky in that it gave up the ghost driving on my block (whirl of death) and I was able to back it in the drive before it quit. Turns out it was just a wire that had broken its riveted connection to the connector. Impossible to solder, I pulled the pin, inserted stripped wire into the the pin hole in the connector and splayed it out such that pushing the pin back in made a tight pinch connection. Had a replacement pump ordered, so waited and replaced that while the bed was tilted up.

simple brake pad and rotor replacement... etc, etc... thanks again. Sites like this are what makes the web great... people sharing their experience.


Mark_88

Well-Known Member
Joined
Aug 11, 2007
Messages
18,554
Reaction score
240
Points
63
Age
68
Location
Ontario, Canada
Vehicle Year
2007
Make / Model
Dordge
Engine Size
3.3 Fuel Injected
Transmission
Automatic
My credo
Love Thy Neighbor
This one has been sitting for a while so I thought I'd start with it. Glad you found the help you needed and thanks for posting your appreciation. I'm pretty sure I wasn't one of the ones that helped you but it sure is nice to see people saying thanks.

And you're off to a good start with the repairs so I hope you have been enjoying the Ranger...don't be a stranger just because you don't need help...feel free to help out with your experience if you can...it's what makes TRS so great.
 

Casual_Reader

New Member
Joined
Sep 2, 2015
Messages
30
Reaction score
1
Points
0
Vehicle Year
93
Make / Model
Ford
Transmission
Manual
...feel free to help out with your experience if you can...it's what makes TRS so great.
thanks Mark. I wasn't expecting any response, but it's nice to know someone was reading.

I am about to put new cab corners in with panel bond (evercoat maxim that only needs a regular caulk gun) some time in the next couple of weeks, maybe I'll get pics as I go along so the guys without welders can see how I'm going to do it - good or bad. The corners came from ebay for a little less than 70 for both delivered - good quality and much larger than I'll need.

I don't know what got into me, but it's been a busy month. Maybe it's just being tired of what's on tv?

Since posting last, I did get the cab mount in... after dropping the tank. Drilling the bolt out from inside the cab made the job a lot easier (a trick I learned here). Running through bits from an eighth to half inch in 16th increments made it a breeze. And as always, dawn detergent makes a great cutting oil.

My truck is a practical joker... with perfect comedic timing. I wanted the tank as empty as possible before dropping the tank - right? I got in to drive around and burn the last 16th of a tank off and the gas gauge was showing way above full. heh. The wire to the sender had broken off from the connector like the power wire to the pump had done.

also - the tank straps were shot... so replaced them. Luckily, the truck sits high enough to maneuver the tank out without having to put the truck up on stands. Not the easiest of one person jobs, but slow wins the race?

alternator replaced... it was doing its job fine, but bearings were whirling when cold... and only getting worse. Made sure it wasn't the tensioner pulley (which I had to replace a few years ago). Simple job, but the frame rails in the way of getting a ratchet on the bottom bolts was a bit irritating.

The starter solenoid switch was the practical joke the truck would pull when I was in a store parking lot far from home. click - no start several times. Then after a minute of wondering what to do (hoping I had a screwdriver in the truck - or a glove to insulate me from the tire iron), it'd start right up. Took the wires off and hit all the contacts with contact cleaner... no issues since then.

Blue Coral carpet/upholstery cleaner is great. I tried a can of stuff on sale first - no comparison. The cloth seats were crusty after 25 years... blue coral cleaned and made the fabric soft again. It also did better than expected on the carpet... all but the drivers side brown dirt in light gray carpet (no mats). Even so, I did end up pulling the seats out and spraying them down to rinse out all the deep dirt and set them out in the sun to dry. The upper section was easy to pull off and toss in the dryer on low setting.

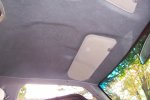
And then I went really crazy... took out the headliner and lined it with vinyl cloth that was on sale when I went to get some foam backed headliner at joann's fabrics. Its heavy enough that spray on adhesive wasn't going to get it done... so I went with brush on contact cement.

The trick is not to stretch the fabric when laying it on... it's basically a rubber band that will bend the flimsy headliner. A heat gun will release the glue for a second try if you get to it in the first day or so... slow and easy.

The headliner is pressed layers of what I'm sure is cotton fiber with a glue to hold it together. I'm sure it's cotton because when I used superglue to get the separating layers at the edge back together, the fibers actually smoked and got really hot - superglue on cotton - who knew?

In places where the thin inside plastic layer (that you glue to after rubbing all the old foam off carefully) came off, I soaked it with wood glue... otherwise, the cotton layers will soak up all the glue/cement you put on it and still not hold. A $12 quart will do a headliner (and I put it on thick)... if most of it doesn't get sucked into the cotton fiber. It might be a better choice for even the foam backed liner given the price of spray on adhesives... roll it on... it's thin out of the can.

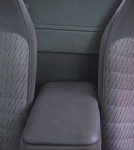
and then I recovered the lid of the center armrest / console because my arm had worn it out. 1/4" staples into the plastic lid.

and then... I redid the carpeted panel on the back of the cab. I had to fill a few holes in the pressed board backing with bondo... but it all turned out nice.

Normally, it would have been an expensive idea, but the clearance table vinyl was only 4.50 a yard off a 54" roll... and then they took off half of that for what was at the end of the roll... so like $12 for all of it - less than what the foam backed headliner material would have cost me.

It was a bit of a pain at times, but worth it to me... the vinyl cloth is easy to wipe down. With a sliding back window, dirt from the bed always collected on the old fuzzy headliner.

pics.. it has a bit of lighter gray stripy-ness to it making it appear uneven in the pics... but it's all smooth.

today... took off back bumper to chip off rust scale and soak it with phosphoric acid to delay the time when the rust eats through to the chrome. I may be too late in a spot or two... nothing a "rust never sleeps" bumper sticker won't cover.
 

Attachments

Last edited:

Mark_88

Well-Known Member
Joined
Aug 11, 2007
Messages
18,554
Reaction score
240
Points
63
Age
68
Location
Ontario, Canada
Vehicle Year
2007
Make / Model
Dordge
Engine Size
3.3 Fuel Injected
Transmission
Automatic
My credo
Love Thy Neighbor
Thanks for the update...

t looks pretty good from what I can see...I have read other posts where they used the spray on adhesives for head liners and I figured that would be best for someone like me because I'm mess prone with anything in a can...

TRS does have a way to post a "How To" that they make into Tech Articles if they are something that hasn't been done. I made a few myself over the years and I think my Oil Catch Can is still floating around. Even though it was a dismal failure I did get input from a few members who offered really good suggestions so I didn't delete the thread after giving up on it.

If you do something and document it that is a great way to do payback if you are so inclined. Some can be a bit of work to put together and with the photobucket issue that just took out a whack of photos it's a bit more challenging...but still worth it and possible if you can find a hosting site that doesn't cost you a small fortune.

Keep up the good work...sounds like you've got the bug...:)
 

Sponsored Ad


Sponsored Ad

Members online

Today's birthdays

Member & Vendor Upgrades

For a small yearly donation, you can support this forum and receive a 'Supporting Member' banner, or become a 'Supporting Vendor' and promote your products here. Click the banner to find out how.

Truck of The Month


Shran
April Truck of The Month

Recently Featured

Want to see your truck here? Share your photos and details in the forum.

Follow TRS On Instagram

TRS Events

25th Anniversary Sponsors

Check Out The TRS Store


Sponsored Ad


Sponsored Ad

Sponsored Ad


Amazon Deals

Top