• Welcome Visitor! Please take a few seconds and Register for our forum. Even if you don't want to post, you can still 'Like' and react to posts.

One more 2wd 98 coil spring 5.0 swap.


oddball101

New Member
Joined
Jun 8, 2010
Messages
138
Reaction score
0
Points
0
Location
Columbia SC
Vehicle Year
01
Make / Model
Ranger
Engine Size
5.0
Transmission
Automatic
Most likely I suppose. Looking forward to your next updates!!


Jbrown1238

Member
Joined
Sep 3, 2010
Messages
691
Reaction score
6
Points
18
Location
Largo, Fl
Vehicle Year
2003
Make / Model
Ford
Engine Size
306
Transmission
Manual
My credo
None
Most likely I suppose. Looking forward to your next updates!!
I do like the idea of "dripping" a little solder into the cavity as it does make for a very good connection. I have been working on a couple small updates but have not got enough info assembled to post up yet. I am still trying to adjust to the time change and finding the energy to work after dark. It gets dark so early now! Oh well, here is my immediate task list so you can see what direction I am moving and what is coming up in the near future.


Merge battery harnesses and solder wires, starter, ac clutch, ac hp switch.
Merge oil pressure sending wire (DG/WH) to Ranger harness
Attach coolant lines to upper intake with clamps on both ends.
Install various gaskets EGR, etc.
Route vacuum line on driver side.
Install EVAP hose to upper intake.
Bleed clutch system.
Attach alternator wires.
Position cam sensor.
Clean and reinstall oil filter hoses.
Attach starter harness to frame rail on driver side (where secured by wire).

Connect grounding straps. Rear of engine, passenger side frame rail, fire wall, core support, fuel tank, etc.
Check all spark plugs wires.
Check heater core hoses for correct orientation.

Check all vacuum lines.
Fill fluids. Oil, water, power steering, transmission.
Check all wires.
Program ECM, delete PATS, delete rear O2's.
Install battery.
Prime oil system.
****Test start****

Merge upstream O2 sensor, passenger side
Check bolts for front suspension, cab/frame, rear suspension.
Check bolts for trans, engine, fuel tank, headers.
Install Speedometer cable/harness.

Install longer ARP rear wheel studs.
Trim/cut shifter and attach interior trim cover.

Send out to Jim for exhaust.
 
Last edited:

Jbrown1238

Member
Joined
Sep 3, 2010
Messages
691
Reaction score
6
Points
18
Location
Largo, Fl
Vehicle Year
2003
Make / Model
Ford
Engine Size
306
Transmission
Manual
My credo
None
When I was installing the tank to filter fuel line I noticed that one of the quick connectors was damaged. As it turns out the local salvage yards will not sell salvage fuel lines and the dealership no longer offered the correct replacement part. So it was off to Hoses and Hydraulics to have the OE piece repaired. On the way I decided to go ahead and have both ends replaced with new quick connectors to avoid issues in the future.


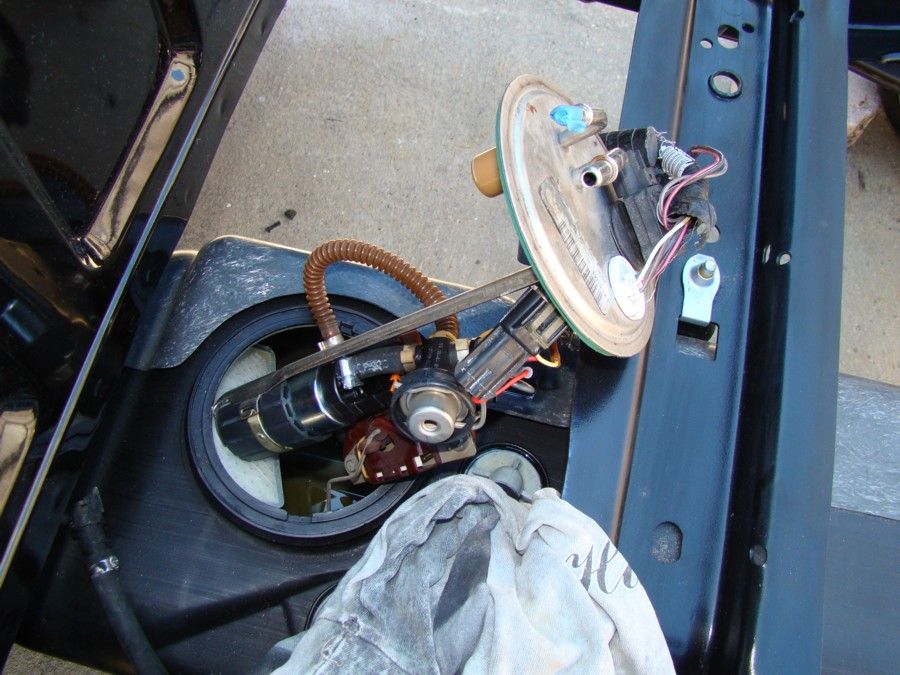
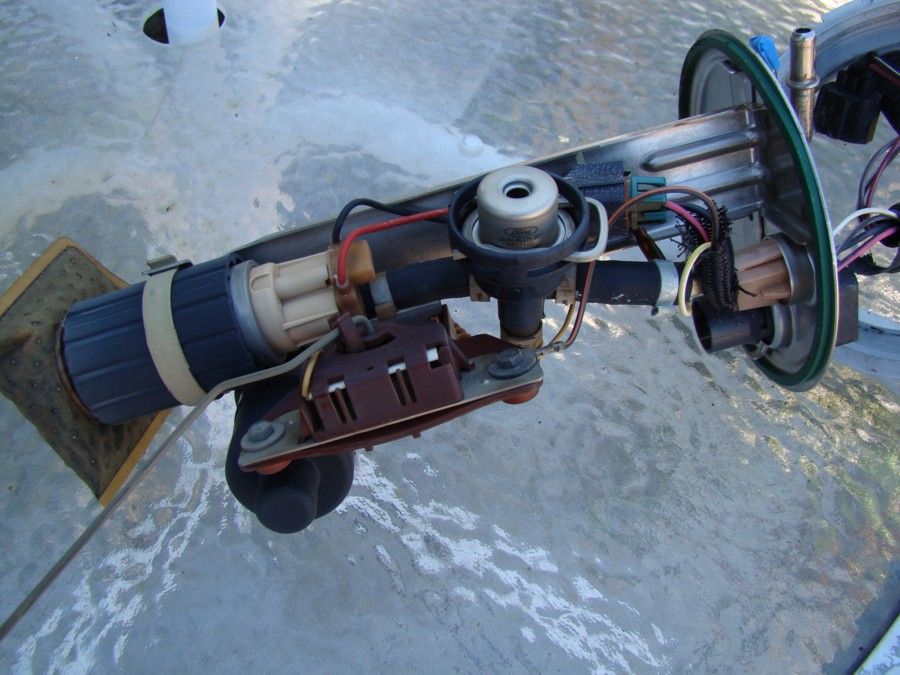
Once that problem was addressed I removed the fuel pump assembly from the fuel tank in preparation to install the new Walbro 190 LPH fuel pump.


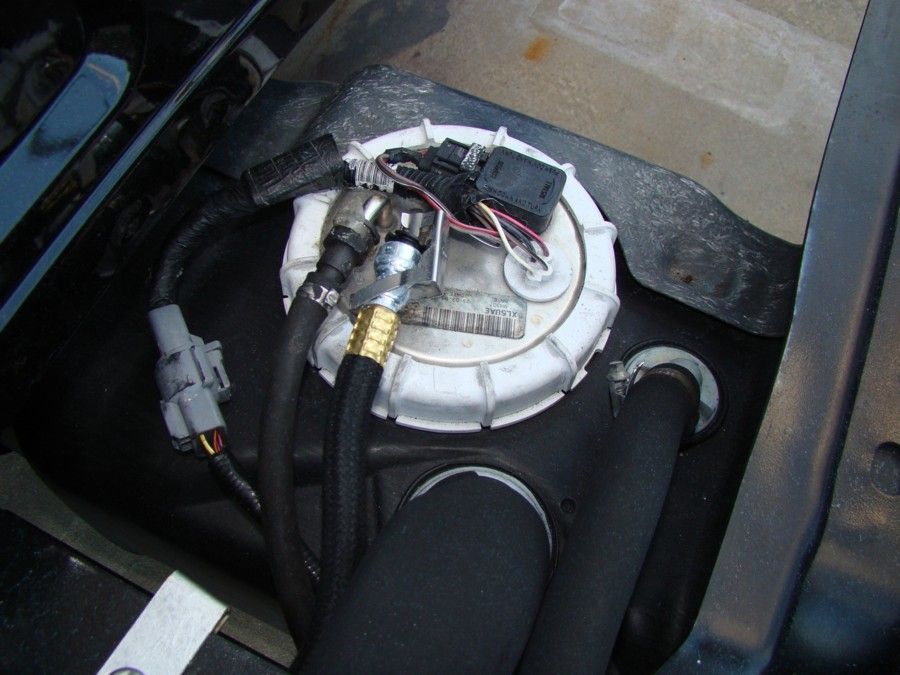
After the new pump and filter were installed the assembly went back into the Ranger fuel tank.


Then the retaining ring was secured and the fuel lines and electrical plugs were connected.


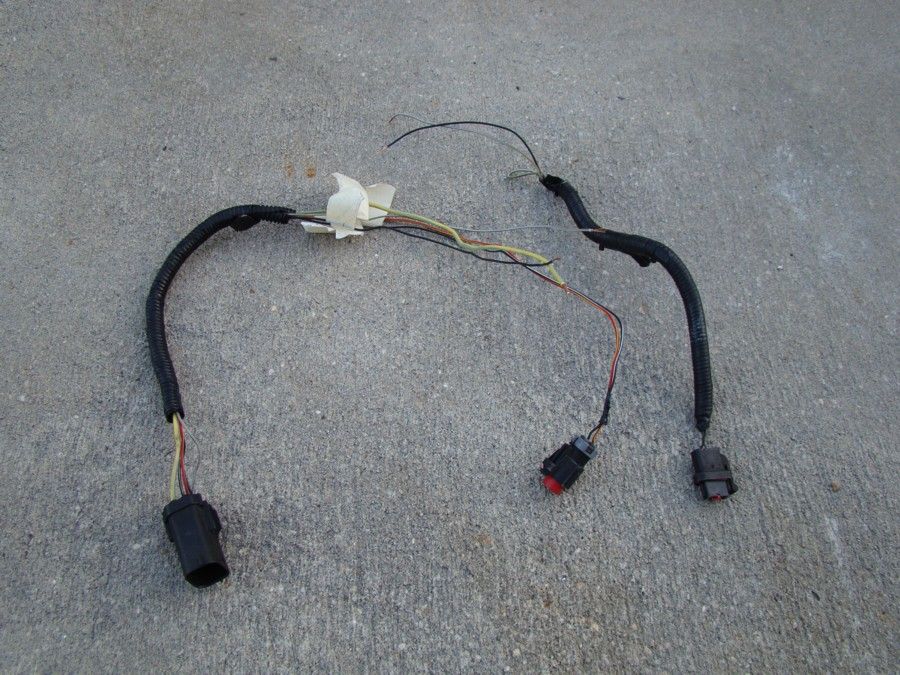
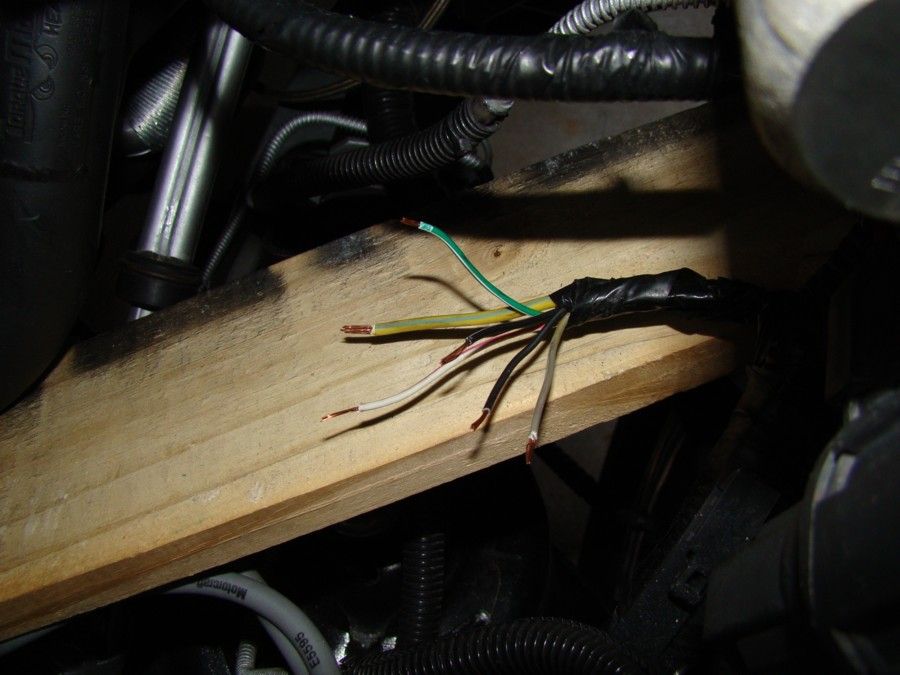
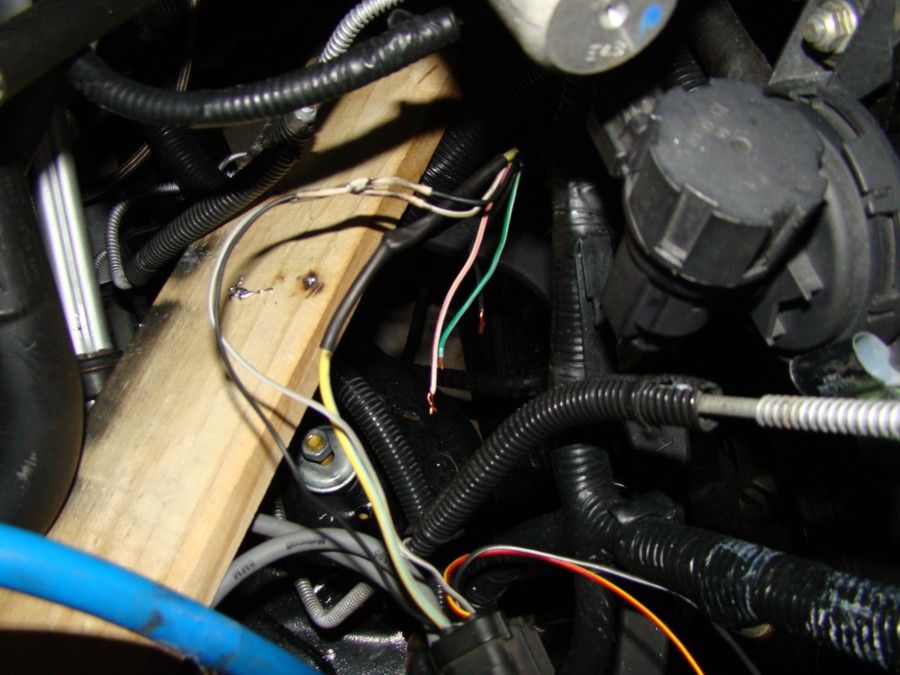
The 12 pin connector on the left fender well still needed a little attention. Several of the electrical wires were identified and prepped to be added. The Y/LTB starter wire, the R/Y & BK/W - AC High pressure switch, and the GY/W & BLACK - AC Compressor clutch, were all soldered and shrink wrapped and added to the 12 pin connector. The DG/WH - Oil pressure sending switch wire was pulled and run directly into the Ranger 42 pin connector on the chassis side.


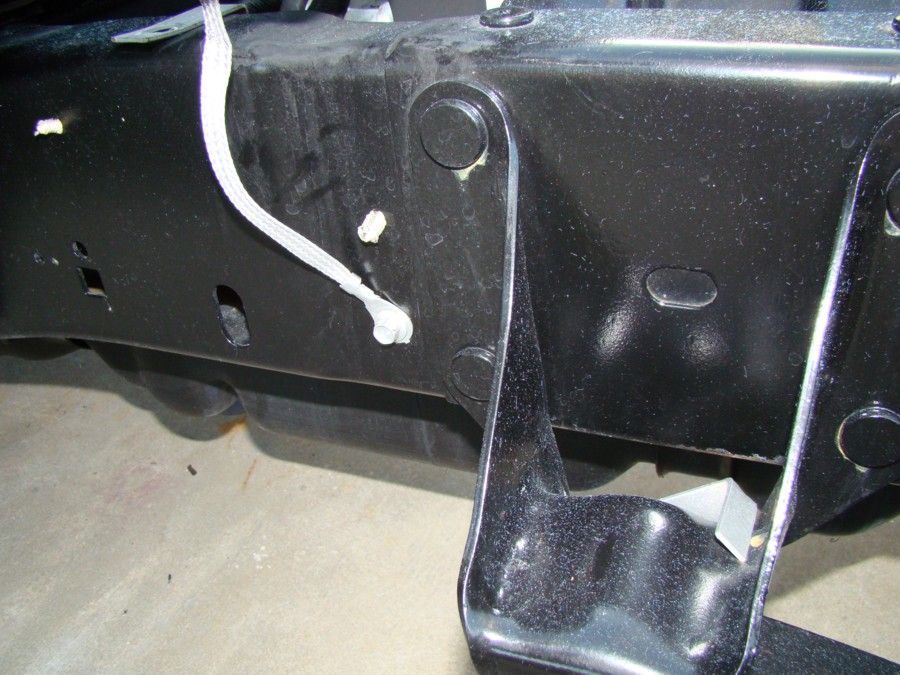
Then several ground straps were reinstalled, fuel tank to frame, cowl panel to engine, and frame to body.


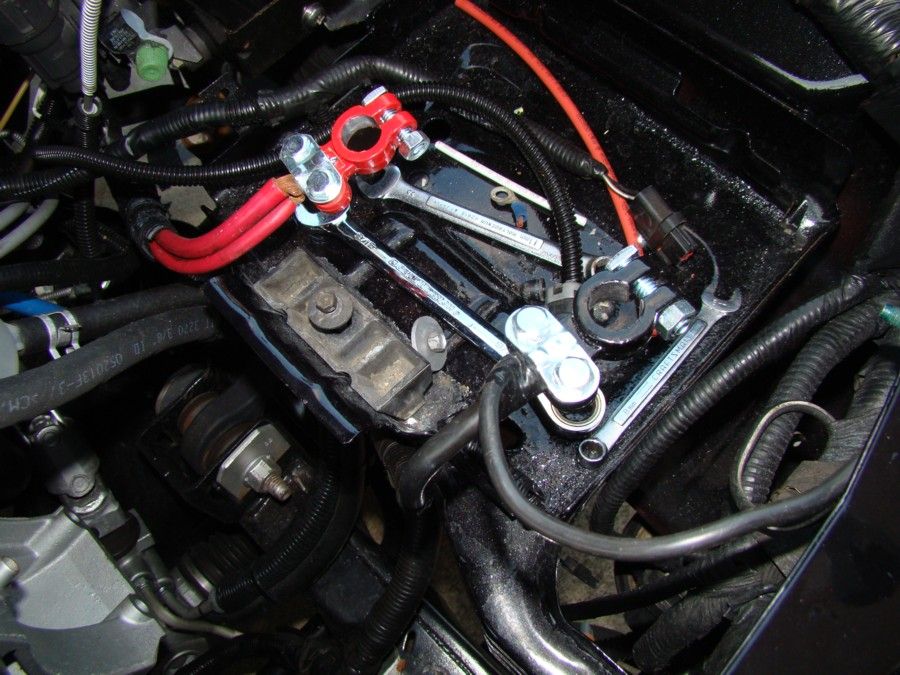
New battery terminal clamps were also added.


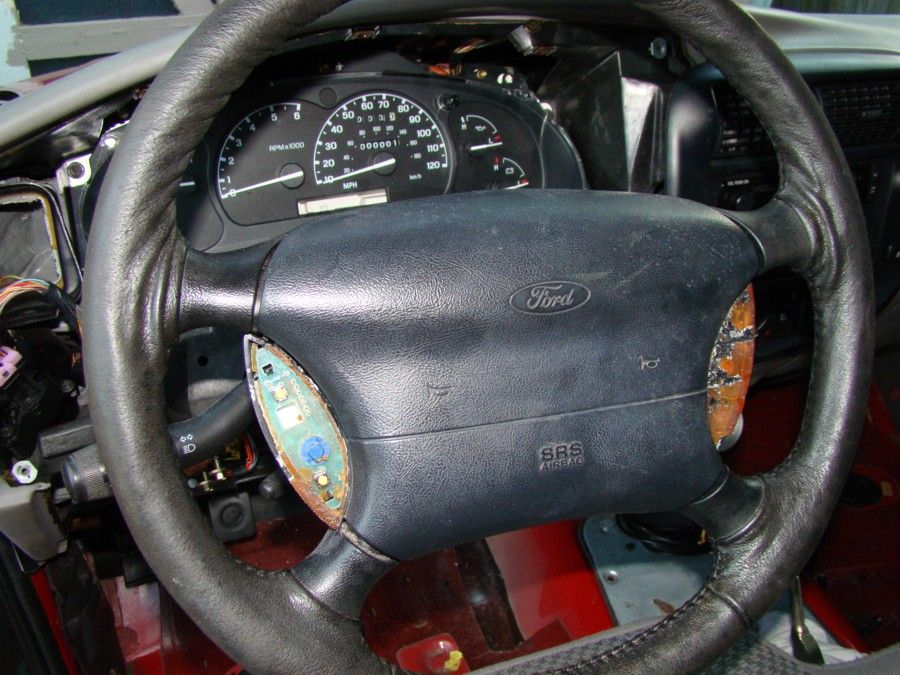
The gauge cluster and air bag were also temporarily reinstalled so the vehicle can be test fired in a couple weeks. A new air bag and 2004 Ford Lightning Leather Wrapped Steering wheel are on the Christmas list. With a little luck there will be a few modern improvements when the Leather seats are installed early next year.


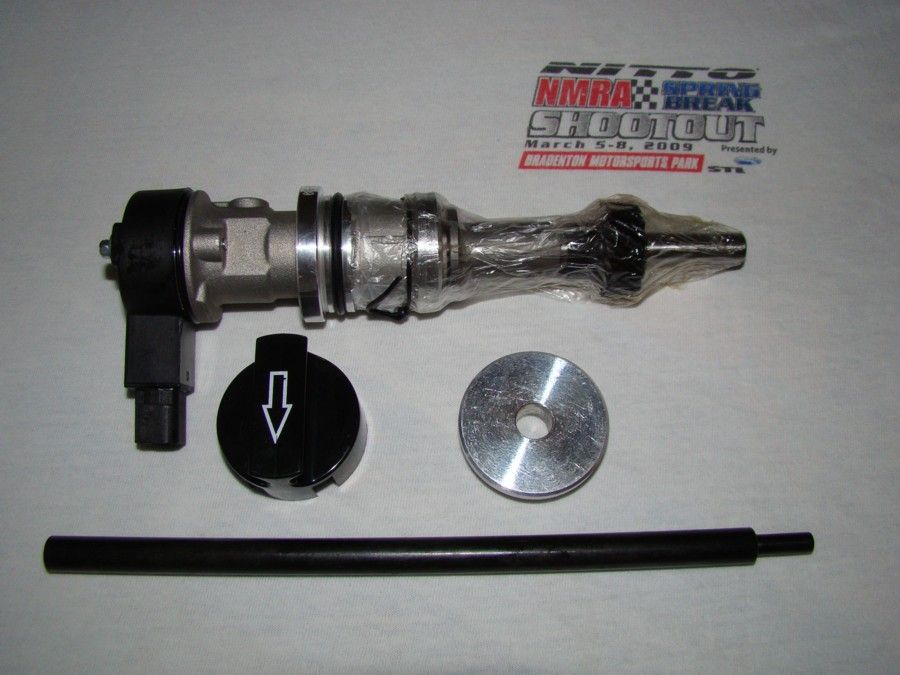
As already mentioned, I am quickly going through the task list getting ready to test fire the vehicle. One of the final items is to align the cam positioning sensor. This requires a special tool which I do not have. With a little research I found that I had a choice to make, $35.00 for the special tool or $36.00 for a new cam positioning sensor with the special tool included. Well, that was easy! I also went ahead and ordered an oil system priming tool to make that task item go easier.


Although I don’t have any photos I also filled the engine with oil, added the power steering fluid, and added the transmission fluid. I still need to add the coolant. I am still on track to test fire in a few weeks.
 

win

Member
U.S. Military - Veteran
V8 Engine Swap
Joined
Jan 13, 2014
Messages
335
Reaction score
12
Points
18
Vehicle Year
2002
Make / Model
Ford
Engine Size
5.0
Transmission
Automatic
Getting close!
 

RangerSVT

Oct 09 OTOTM
Article Contributor
V8 Engine Swap
OTOTM Winner
Solid Axle Swap
RBV's on Boost
ASE Certified Tech
TRS Banner 2010-2011
TRS Banner 2012-2015
Joined
Mar 15, 2009
Messages
7,883
Reaction score
53
Points
48
Location
TRS since 2002 - NW KY
Vehicle Year
19962002
Make / Model
Ford
Engine Size
GT-40 5.0L EFI W/AC
Transmission
Automatic
Those battery terminals will give you problems later on. It's best to solder copper lugs onto the cables, and bolt them to a terminal. If you want a better quality terminal, let me know...

SVT
 

Jbrown1238

Member
Joined
Sep 3, 2010
Messages
691
Reaction score
6
Points
18
Location
Largo, Fl
Vehicle Year
2003
Make / Model
Ford
Engine Size
306
Transmission
Manual
My credo
None
Those battery terminals will give you problems later on. It's best to solder copper lugs onto the cables, and bolt them to a terminal. If you want a better quality terminal, let me know...

SVT
Can you recommend a better terminal? I just picked these up at Advance Auto Parts last week. I didn't really like any that I found but needed to replace the two that were on there.
 

Jbrown1238

Member
Joined
Sep 3, 2010
Messages
691
Reaction score
6
Points
18
Location
Largo, Fl
Vehicle Year
2003
Make / Model
Ford
Engine Size
306
Transmission
Manual
My credo
None
I charged the battery today and set it into place to check the electrical wiring. Everything appears to be normal, I have power to the dash, the fuel pump primes when the key is turned to the on position, and there is no indication of any issues so far. I still need to load the tune, add coolant, prime the oil system, and position/align the cam sensor synchro. Then turn the key for real and see if anything happens! Even though it will be ready beforehand, I am going to save that moment for when my son arrives from Texas for the holidays. Open header start up video coming soon.
 

RangerSVT

Oct 09 OTOTM
Article Contributor
V8 Engine Swap
OTOTM Winner
Solid Axle Swap
RBV's on Boost
ASE Certified Tech
TRS Banner 2010-2011
TRS Banner 2012-2015
Joined
Mar 15, 2009
Messages
7,883
Reaction score
53
Points
48
Location
TRS since 2002 - NW KY
Vehicle Year
19962002
Make / Model
Ford
Engine Size
GT-40 5.0L EFI W/AC
Transmission
Automatic

oddball101

New Member
Joined
Jun 8, 2010
Messages
138
Reaction score
0
Points
0
Location
Columbia SC
Vehicle Year
01
Make / Model
Ranger
Engine Size
5.0
Transmission
Automatic
I am not sure why but when I soldered copper leads onto the battery cables, they corroded pretty badly after several months and now when I clean them it only takes about a week for them to look all nasty again. I don't know if it is the solder I used (the internal flux kind) or what but it is killing me. Wish I knew what to do to stop it..
 

deathbypsi

06/2012 STOTM Winner
MTOTM Winner
TRS 20th Anniversary
Joined
Dec 14, 2008
Messages
718
Reaction score
79
Points
28
Location
Mich
Vehicle Year
88
Make / Model
ford
Engine Size
2.3turbo
Transmission
Manual
Wow very impressive work. Waiting for the finished product..
 

Jbrown1238

Member
Joined
Sep 3, 2010
Messages
691
Reaction score
6
Points
18
Location
Largo, Fl
Vehicle Year
2003
Make / Model
Ford
Engine Size
306
Transmission
Manual
My credo
None
Wow very impressive work. Waiting for the finished product..
Thank you very much. Yes I am waiting for the finished product as well. I am feeling pretty good about everything and hope that the test start goes well. If there are no issues it should go out for exhaust during the month of January and then that leaves Feb, March, and April to complete the rest of the paint, interior, and work out any bugs that are present. I hope to have it street ready by May 1, 2015.
 

Jbrown1238

Member
Joined
Sep 3, 2010
Messages
691
Reaction score
6
Points
18
Location
Largo, Fl
Vehicle Year
2003
Make / Model
Ford
Engine Size
306
Transmission
Manual
My credo
None
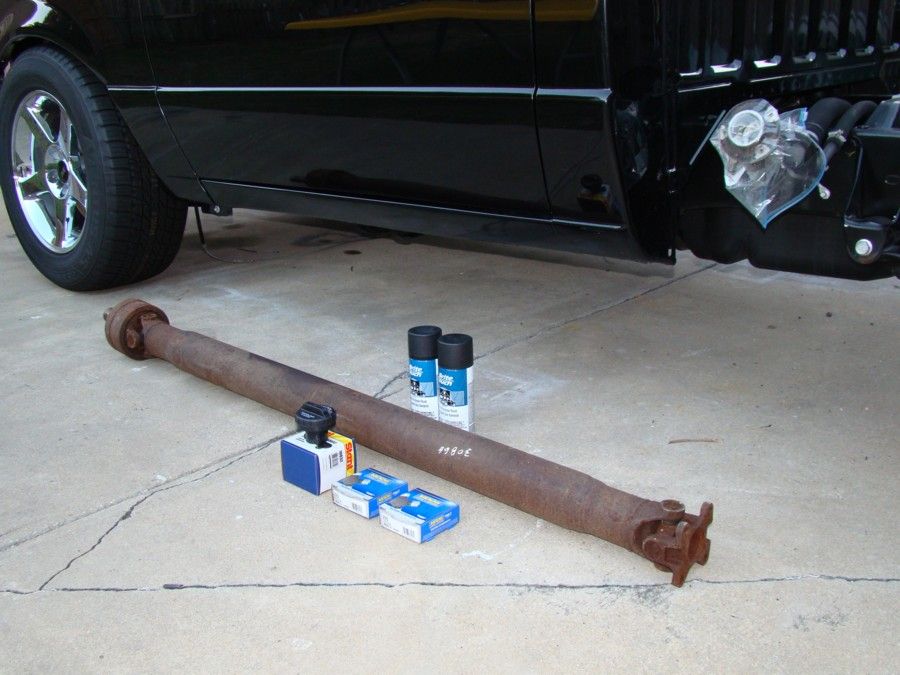
The 3.0 V6 Automatic drive shaft was a couple inches to short for the new set up. I test fit the drive shaft from my 98 Ranger that has a 2.5L engine with manual transmission and it fit fine. I had read that the 4 cylinder manual trans drive shaft was the correct length but just wanted to double check before I made the purchase. I found the correct part at a local salvage yard and picked it up a few days ago. I also went ahead and bought a set of Moog U-joints, a new gas cap, and a couple cans of flat black paint for the drive shaft. It is nice to see that the parts list and the parts prices are both shrinking now that the build is moving closer to the final stage. I will send the drive shaft out for media blasting, then paint it black and press in the new U-joints, then it will go out to be balanced.


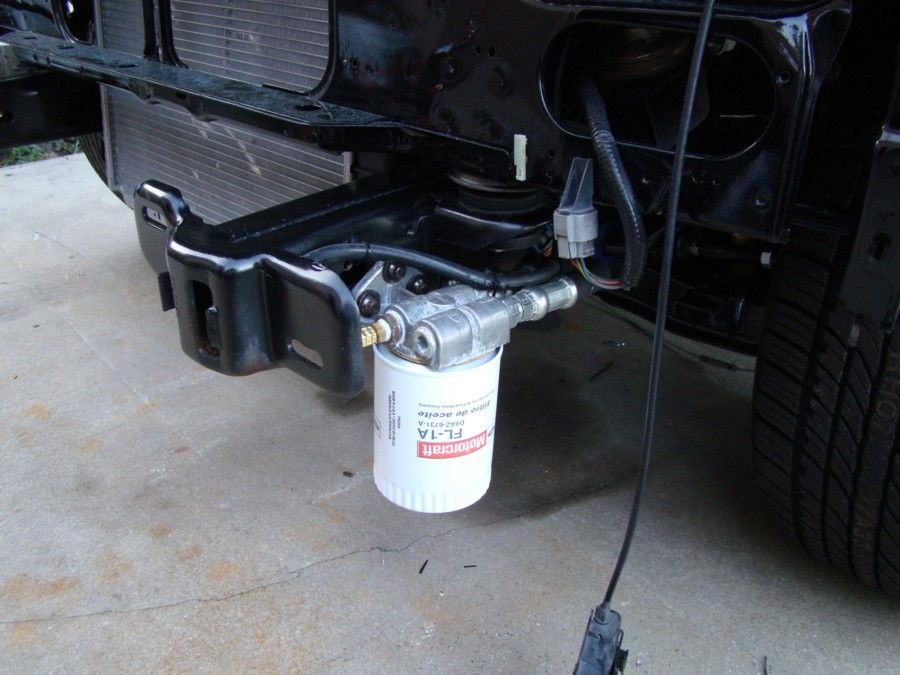
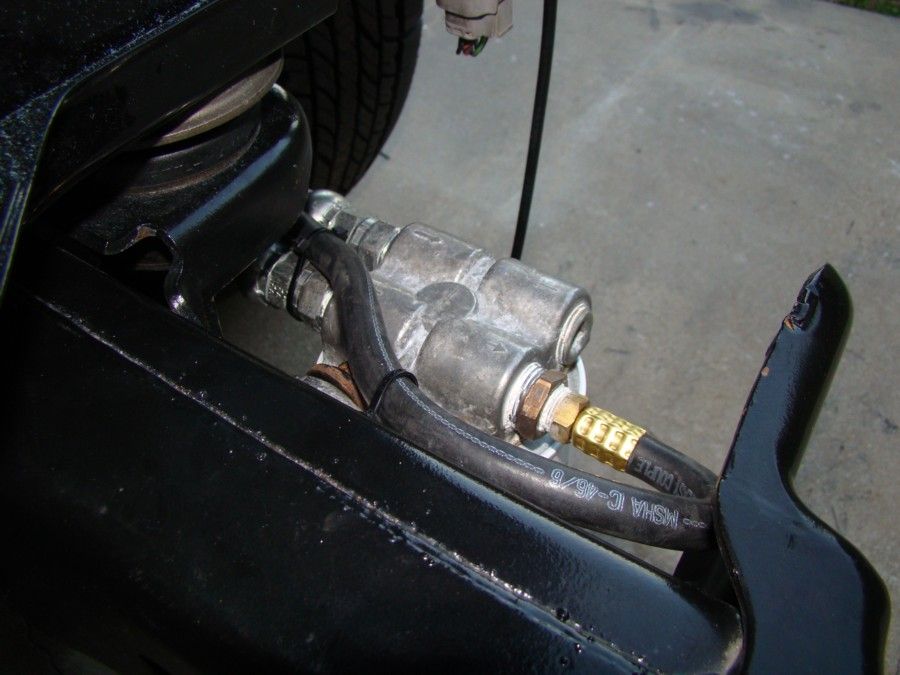
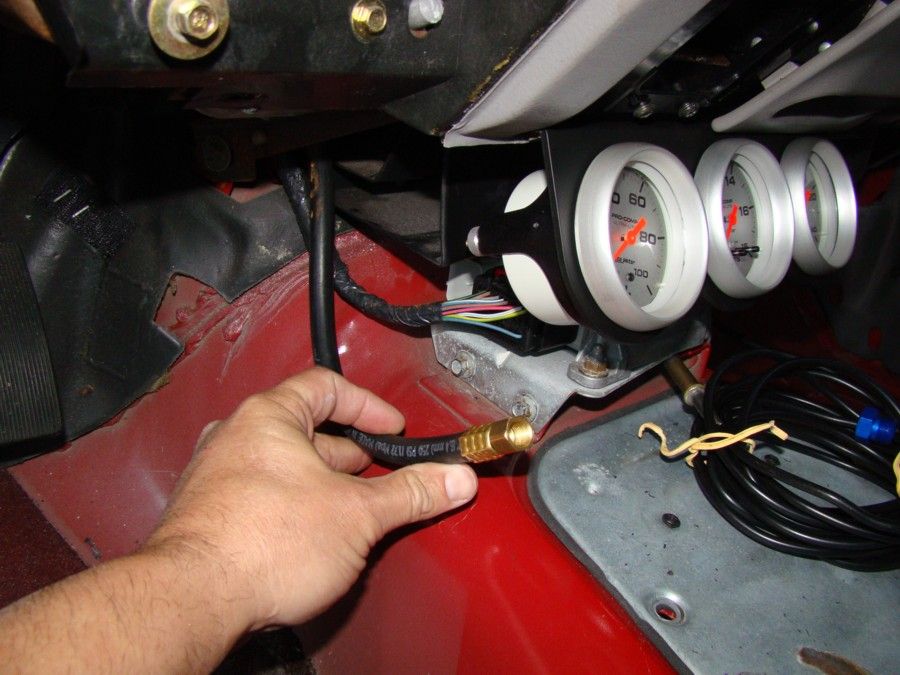
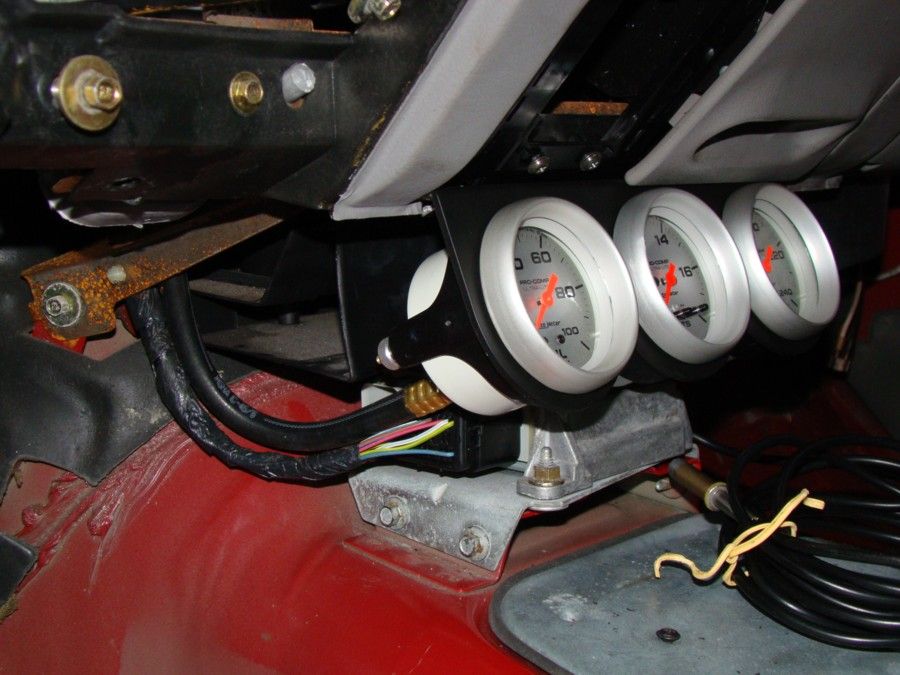
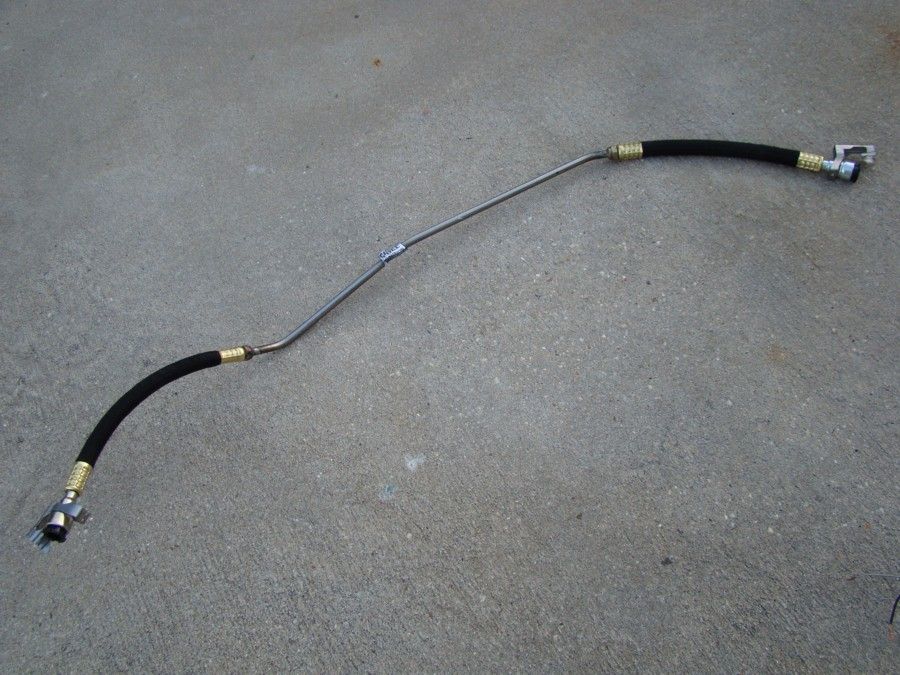
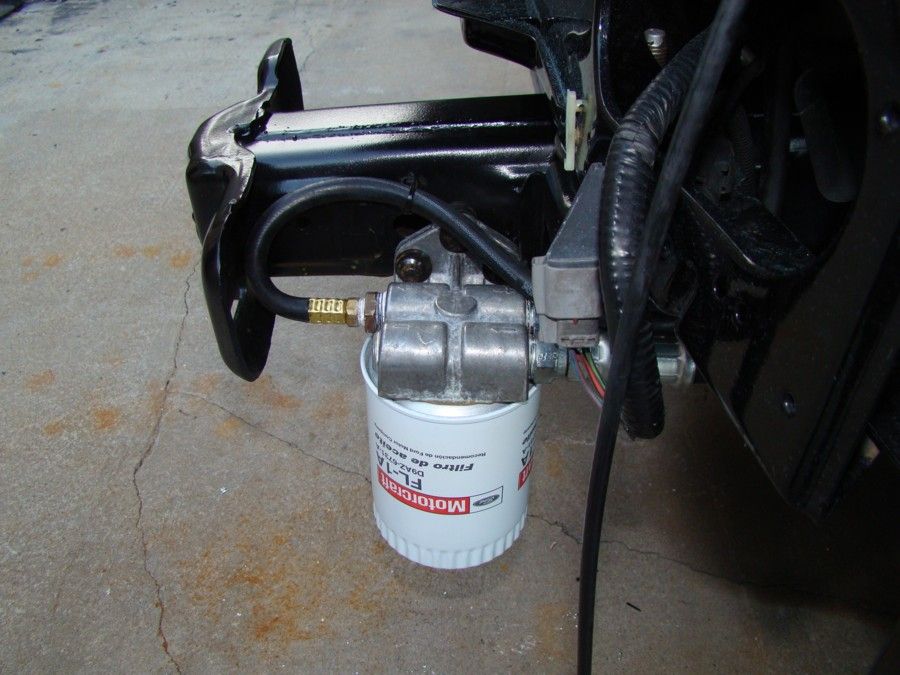
I am getting ready to prime the oil system but wanted to get the mechanical oil pressure gauge working first. I have had issues with the standard tubing and compression fittings in the past and decided to have a hose built. I know it is over kill, but I went with ¼ inch inner diameter hose with a 250 psi burst rating. The 8 foot hose runs all the way up to the front of the truck and ties into the remote filter. It should prove to last many miles and many years with trouble free operation. No kinks or leaks with this set up!


The filter end of the hose has a ¼ inch male swivel fitting going into a ½ inch adapter that fits into the remote filter adapter. Once I am sure the line doesn't need to be moved to make room for the front body pieces I will replace the zip ties with permanent fasteners.


The gauge end of the hose has a ¼ inch female fitting that attaches to the oil pressure gauge.


I figure I will lose about 3-4 lbs of pressure at the gauge because of the length and diameter of the new hose. But it is a trade off, I don't want a mess and sending the small nylon hose all the way to the front was out of the question.
 

Jbrown1238

Member
Joined
Sep 3, 2010
Messages
691
Reaction score
6
Points
18
Location
Largo, Fl
Vehicle Year
2003
Make / Model
Ford
Engine Size
306
Transmission
Manual
My credo
None
One final step remains before I try to start the truck for the first time. I just need to prime the oil system prior to turning the key. I have already set piston #1 at TDC on the compression stroke and aligned and test fit the cam sensor. Even though the engine will be manually turned over when the oil system is primed I wanted to be sure there wouldn't be a surprise with fitting the cam sensor. All the fluids are loaded, the tune is loaded, there is pressure at all three pedals, and there is power at the key. My son should be in town to assist and the tentative date is Tuesday December 23, 2014. I have my fingers crossed and can't wait to see what happens.
 

Sponsored Ad


Sponsored Ad

Staff online

Today's birthdays

Member & Vendor Upgrades

For a small yearly donation, you can support this forum and receive a 'Supporting Member' banner, or become a 'Supporting Vendor' and promote your products here. Click the banner to find out how.

Truck of The Month


Shran
April Truck of The Month

Recently Featured

Want to see your truck here? Share your photos and details in the forum.

Follow TRS On Instagram

TRS Events

25th Anniversary Sponsors

Check Out The TRS Store


Sponsored Ad


Sponsored Ad

Sponsored Ad


Amazon Deals

Top