• Welcome Visitor! Please take a few seconds and Register for our forum. Even if you don't want to post, you can still 'Like' and react to posts.

Replacing Rusted Cab Corners With Panel Adhesive - (way too many pics)


Casual_Reader

New Member
Joined
Sep 2, 2015
Messages
30
Reaction score
1
Points
0
Vehicle Year
93
Make / Model
Ford
Transmission
Manual
Total auto body newb without a welder here - you've been warned.

"can't pay me what I'm worth... I don't work that cheap" - AvE

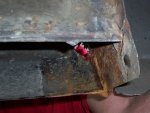
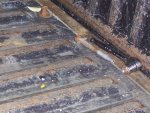
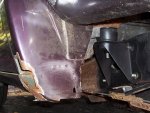
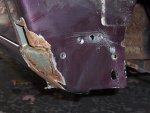
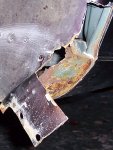
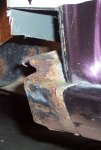
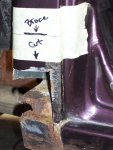
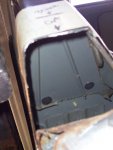
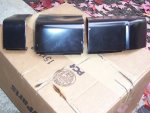
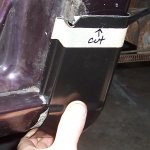
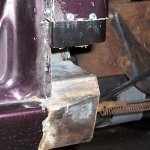
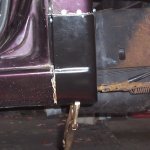
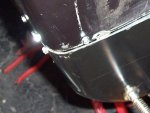
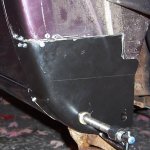
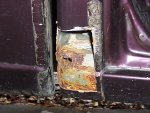
Paint bubbles... rust through holes... it came time to cut open the cab corners and see what was going on.

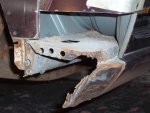
The passenger side had the worst of it. The rust goes around the corner leaving no solid cab corner metal on the outside of the end of the rocker panel to attach a simple patch... so it's going to need new cab corners.
 

Attachments


Casual_Reader

New Member
Joined
Sep 2, 2015
Messages
30
Reaction score
1
Points
0
Vehicle Year
93
Make / Model
Ford
Transmission
Manual
The tail end of the rocker panel has obviously seen better days. That hole will need to be patched before the new corner goes on.

Thankfully, the rest of the rocker panels are in great shape
 

Attachments

Casual_Reader

New Member
Joined
Sep 2, 2015
Messages
30
Reaction score
1
Points
0
Vehicle Year
93
Make / Model
Ford
Transmission
Manual
Unfortunately, getting to the back of the cab corners means moving the bed out of the way.

Given my pace on the repair (free time, weather, total lack of experience and quite a bit of rust treating, etc) and wanting to still drive it, I'd be moving the bed a lot.

I'd already broken several of the the torx bolts and clips on previous repairs (got new hex head bolts and found a set of salvaged clips from a southern truck on ebay) but was tired of the cumbersome task of lifting / tilting the bed up on 2x4s.

12 dollars and a coupon at harbor freight got me a rope pulley hoist which they say is good for 300 lbs... I won't be testing that claim, tyvm.

A heavy eye hook inside a garage door and I was ready to go. I remove the front 4 bed bolts and loosen the back 2 for the bed to hinge on... 5 minutes - bolts and hoist the bed out of the way.

The last pic shows how high it tilts without overly stressing the gas fill tube - plenty of room to get a grinder and drill in there.
 

Attachments

Casual_Reader

New Member
Joined
Sep 2, 2015
Messages
30
Reaction score
1
Points
0
Vehicle Year
93
Make / Model
Ford
Transmission
Manual
light 80 grit sanding helps locate the center of the spot welds.

Rather than drilling an 8th inch hole in the center and following it up with 5/16ths bit to cut through the top layer of sheet metal... and then chiselling them apart... I opted for a $5 harbor freight spot weld cutter. (actually had it left over from replacing the radiator support). I've had good luck with it... perhaps because I baby it by dipping the tip in dawn dish soap before each cut.

The downside (if there is one) is that it's easy to cut through both layers if you're not paying attention and/or can't feel the top layer release.
 

Attachments

Casual_Reader

New Member
Joined
Sep 2, 2015
Messages
30
Reaction score
1
Points
0
Vehicle Year
93
Make / Model
Ford
Transmission
Manual
On the passenger side, I first cut the two spot welds on the outside bottom and then cut from the initial hole I'd made to the inner door jamb so I could peel it back and see how bad the bottom of the rusty rocker end was. Actually, not all that bad.

The outer part of the door jamb will be in the way of the after market cab corner. I scraped the seam sealer out and trimmed up the bottom so that section can be bent back out of the way. More on that later.
 

Attachments

Casual_Reader

New Member
Joined
Sep 2, 2015
Messages
30
Reaction score
1
Points
0
Vehicle Year
93
Make / Model
Ford
Transmission
Manual
The cab corners are larger than I, or anyone else, would probably need.

As I reached up in the hole I'd cut out, I felt what I thought was bracing, which was fine because I could cut out all the rust and still have room to glue a flange in as backing for the replacement cab corner.

It turns out that what I thought was bracing was merely a flap with sound deadening foam on top. It's hinged with two panel fasteners.

The driver's side flap was a lot lower than the passenger's side, but I was able to shove it up out of the way so that both sides would be the same.
 

Attachments

Casual_Reader

New Member
Joined
Sep 2, 2015
Messages
30
Reaction score
1
Points
0
Vehicle Year
93
Make / Model
Ford
Transmission
Manual
The rough fitting cut on the body gave easier access to the evil within.

I scrubbed that mess out with a scotch brite pad, and soaked it with phosphoric acid to neutralize any rust, rinsed it out, dried it immediately with a heat gun and then primed and painted it white (because that's what was on a basement shelf - no idea what she thought she was going to paint white).

I left the outer section bare until I could grind and sand the rest of the rust and scale off and patch that hole.
 

Attachments

Casual_Reader

New Member
Joined
Sep 2, 2015
Messages
30
Reaction score
1
Points
0
Vehicle Year
93
Make / Model
Ford
Transmission
Manual
A bent up piece of sheet metal, a rock hammer, an ancient pair of lineman pliers, a piece of angle aluminum and a brick...

Turns out the bent piece of metal fits perfectly inside the rocker panel to fill the hole.

All I had to do was slather some bondo glass on it and pull it in tight with a couple of self tapping sheet metal screws. (I was still waiting on the panel adhesive which was lost in transit)

Before the bondo glass hardened all the way, I trimmed it flush to the outside of the rocker with a razor, sanded what little was left, taped off the contact points for the panel adhesive and sprayed primer and paint. The adhesive will cover and protect what is now bare metal.

Once the corner is firmly in place, I'll use more bondo glass underneath to seal off any gaps / screw holes into the cavity (other than the seep hole at the bottom back).
 

Attachments

Casual_Reader

New Member
Joined
Sep 2, 2015
Messages
30
Reaction score
1
Points
0
Vehicle Year
93
Make / Model
Ford
Transmission
Manual
Getting on with it. With the body rough cut, time to cut the cab corners down - a bit larger than the opening.

I also cut the top sections off both.

(complimentary cutting bench courtesy of KeyParts who only sell to merchants - I got this pair on ebay for $67 from a merchant who had them drop shipped)
 

Attachments

Casual_Reader

New Member
Joined
Sep 2, 2015
Messages
30
Reaction score
1
Points
0
Vehicle Year
93
Make / Model
Ford
Transmission
Manual
Why cut the top sections off?

Spoiler: I'm lazy, yet observant - see pic.

Because the back corner bend isn't perpendicular to the edges of that cut off section, I needed the passenger section for the drivers side, and vice versa.
 

Attachments

Casual_Reader

New Member
Joined
Sep 2, 2015
Messages
30
Reaction score
1
Points
0
Vehicle Year
93
Make / Model
Ford
Transmission
Manual
or you could bend a fresh piece and try to get the downward / inward bend of the corner just right so the panels layer onto this flange perfectly flat.

I'm not that good... so option A worked for me.
 

Attachments

Casual_Reader

New Member
Joined
Sep 2, 2015
Messages
30
Reaction score
1
Points
0
Vehicle Year
93
Make / Model
Ford
Transmission
Manual
4" above the top of of the rocker gets past the rust I had and still gives me plenty of glue surface area below that flap inside.

I trimmed both the inner edge of the corner and the door jamb to that measurement and set it in to check that there was plenty of overlap. Then I extended the measurement on the cab corner and cut it.

Around the corner was a bit tricky to keep it all level to the ground. I measured and marked for far too long before realizing I could have just cut the side portion and then set it in to best fit and used a 6" torpedo level to scribe the back section.

Either way, none of of it was as critical as I was making it out to be. This glued flange method doesn't need to be as precise as you'd need to be for butt welding where you'd want an even 32nd or so gap between the pieces to accept a good weld.

With this method, the gap could be a quarter inch wide. It's going to be filled in with waterproof bondo glass anyway.
 

Attachments

Casual_Reader

New Member
Joined
Sep 2, 2015
Messages
30
Reaction score
1
Points
0
Vehicle Year
93
Make / Model
Ford
Transmission
Manual
With the corner cut to final size, I fitted it as well as possible and scored around the top of it into the truck's paint and then cut the excess off.

Then I could fit the glue tab in and start fitting the cab corner... starting at the door jamb and working around bit by bit.

The inner flange needed to be pried tight into the corner a bit as I was setting the first screw around the corner, but it fit perfectly.
 

Attachments

Casual_Reader

New Member
Joined
Sep 2, 2015
Messages
30
Reaction score
1
Points
0
Vehicle Year
93
Make / Model
Ford
Transmission
Manual
The corner radius of the after market cab corner wasn't a perfect match to the radius of the truck, but with the backing firmly in place, it wasn't anything the rock hammer couldn't politely adjust before screwing the first bottom screw around the curve.
 

Attachments

Casual_Reader

New Member
Joined
Sep 2, 2015
Messages
30
Reaction score
1
Points
0
Vehicle Year
93
Make / Model
Ford
Transmission
Manual
So far, so good... but a minor complication on the horizon.

On the consumer end (me as consumer / user of product),
the effective strength of the panel adhesive depends on 2 things... surface area and thickness of the adhesive layer.

3/4 to an inch of surface area on each side is good.

Ideally, the adhesive layer would be only as thick as the diameter of the glass beads they put in the adhesive to increase the chances of the adhesive being that perfect thickness. You get the idea - Clamp it down and the beads stop the layers from getting any closer.

Also, Ideally, the panels (panel and glue flange in this case) would be perfectly flat to each other as to allow the beads to determine the thickness... which is why the recycled top strip for the corner was a no-brainer.

But the pirated strip only goes so far. Actually it's as wide as the rest of the cab corner, but once it turns the corner, it angles up. As it angles up, it loses surface area on the bottom for the actual cab corner to glue to.

I trimmed the strip off a little less than 2 inches in from the corner, which leaves me needing to fill the rest of the way with another strip or two.

I know the back of the cab is filthy and the pic may not show it all that well, but there's a couple of bends for stiffness in the panels. Trying to span the entire length with one piece would disrupt the thickness of the adhesive, so 2 more pieces of backing flange are needed - one for each flat area.

There was also a raised seam ridge on the inside of the truck near the end of the run that needed to be avoided / dealt with as I couldn't get inside to grind or sand it down flat.
 

Attachments


Sponsored Ad


Sponsored Ad

Staff online

Member & Vendor Upgrades

For a small yearly donation, you can support this forum and receive a 'Supporting Member' banner, or become a 'Supporting Vendor' and promote your products here. Click the banner to find out how.

Truck of The Month


Shran
April Truck of The Month

Recently Featured

Want to see your truck here? Share your photos and details in the forum.

Follow TRS On Instagram

TRS Events

25th Anniversary Sponsors

Check Out The TRS Store


Sponsored Ad


Sponsored Ad

Sponsored Ad


Amazon Deals

Top