• Welcome Visitor! Please take a few seconds and Register for our forum. Even if you don't want to post, you can still 'Like' and react to posts.

Questions During a Duraspark Conversion


Fords4Us

Member
Joined
Dec 27, 2012
Messages
51
Reaction score
2
Points
8
Location
Snohomish, WA
Vehicle Year
1983
Make / Model
Ford Ranger
Engine Size
2.8L
Transmission
Manual
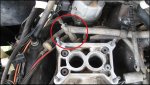
Good evening all. We've been planning to do the Duraspark and non-feedback carb conversion for our '83 Ranger, and this holiday weekend we finally got started. Today we got as far as labeling all the various wires/vacuum lines/etc coming to/from the existing carb, and got the carb removed. We were planning to put the new duraspark coil between the carb and the distributor, but when we pulled the carb we found an unexpected assembly right there. It appears to be a small metal manifold with both vacuum lines and electrical lines going to/from a metal fitting at the very bottom of the riser that the carb bolts into. I've attached a photo with the mystery manifold circled in red. What is that, and is that something we need to remove or do we work around it? Also, we weren't sure if our replacement carb will come with a different riser, perhaps without this extra mystery attachment? Any guidance would be helpful.

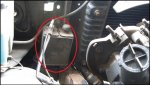
Another mystery item was discovered at the front of the engine compartment immediately alongside the radiator. It also has what appears to be a vacuum line as well as electrical service. I've attached that photo and circled that box in red. The top has what appears to be two raised platforms, with a knob on the top of one platform, and the electrical/vacuum service on the other. Each platform has raised alpha-numeric characters on the two halves, with numbers ranging from 1-6 on the left half (with the vacuum and electrical connections), and letters ranging from A through H on the other half (with the knob that doesn't seem to have a purpose). What the heck is that?

We've been pouring through our Chilton's for any help ID'ing either component, but the book was mum on those subjects (or we haven't found the right photo or drawing yet). Just let us know what those items are, if we need to get rid of them, if we need to keep them, or if we need to do something particular with them. Thanks all!

Can't wait to get this thing back on the road.........
 

Attachments


drchristopher7

New Member
Joined
May 24, 2015
Messages
5
Reaction score
0
Points
0
Vehicle Year
1996
Make / Model
Ford
Transmission
Automatic
Possibility....

On my truck that black box ties into my evap purge valve line for the emissions control...maybe that will help you find some more information..try looking at carbon canister or evap vent control....hope that helps
 

RonD

Official TRS AI
TRS Technical Advisor
Joined
Jun 2, 2012
Messages
25,363
Reaction score
8,367
Points
113
Location
canada
Vehicle Year
1994
Make / Model
Ford
Transmission
Manual
All the lines in both pictures are Vacuum hoses.

First pic is the vacuum manifold, you need this or similar on the new plate, these hoses need to be "under" the throttle plate on new carb, they need intake vacuum.
Above throttle plate is called Ported vacuum.
Intake vacuum goes down when throttle plate opens.
Ported vacuum goes up when throttle plate opens.

Intake vacuum is used for power brakes, PCV Valve, EVAP(gas tank vent), EGR activation.

The second pic is a carbon canister for EVAP system, you will also have a vacuum reservoir, it stores vacuum pressure for use when you are accelerating and intake vacuum is low(throttle plate opens)

If you look at a vacuum diagram for your model here: http://www.therangerstation.com/tech_library/diagrams/1983vacuumhoseguide.jpg

A/CL BI MET is Air Cleaner Bi-Metallic, this opens and closes a flap for the incoming air for the air cleaner housing, it brings in warmer air from around the exhaust manifold when engine is cold.
Just below the is the MAN VAC, vacuum manifold, in you first pic

SA-FV: Separator Assembly Fuel/Vacuum, this is the white/black part in first pic it is connected to the VRESER(vacuum reservoir), the SA-FV prevents fuel, if carb leaks, from building up in reservoir tank over time.

SOL V are vacuum solenoids, they are activated electrically to send or cut vacuum to vacuum operated devices, like EGR and EVAP systems

This thread has all the abbreviations translated, thanks to BlackBII: http://www.therangerstation.com/forums/showthread.php?t=143004
 
Last edited:

Fords4Us

Member
Joined
Dec 27, 2012
Messages
51
Reaction score
2
Points
8
Location
Snohomish, WA
Vehicle Year
1983
Make / Model
Ford Ranger
Engine Size
2.8L
Transmission
Manual
Good afternoon all. Thanks for the info so far; it was helpful to ID those items. I'm making slow but steady progress here as I have the time.

here are my next few questions:
1) I've gotten as far as getting all the EEC vacuum lines out of the way, and I was intending today to remove all the EEC and related wiring harness on the passenger side of the engine, save for a few specifics like the choke wire, oil and temp sending, etc. Um, easier said than done. I unbundled all the wires from the various and multiple layers of corrugated loom and/or electrical tape, only to find that many (most?) of my EEC harness appears to go back towards and apparently through the passenger side of the firewall, while another like-sized volume came forward from the same location, then spread out to various destinations within the engine compartment. I can tease out the TFI lines and at least get those separated out from the rest of the bundle. That's tomorrow's plan. But I wasn't expecting to have all my EEC wires go nosediving through the firewall and into the cab. Is that normal layout or am I missing something? Do they make a big U-turn down where I can't see it?

2. For the existing TFI connection, which is going away, I'm not clear on whether I'm supposed to just clip the individual wires off that six-pin connector, and then manually re-wire them into female plugs which match up with the new wiring. The conversion instructions in the Tech section show examples of male three-blade and four-blade connectors with pigtails, and label them as ECM connectors. Is that what I should use to replace the 6 pin connector?

3. Finally, the formal set of instructions call for replacing the EEC-IV coil with a new duraspark coil, but then I saw comments about just reusing the existing coil. What are the pro's and con's of each approach? I'd like to save money if I can, but if the new coil will give me a hotter spark and/or better performance, then I'll probably just use the one we bought. If there's no performance improvement, I'll take it back.

Sorry if these questions are dumb, but those are the points where I'm stumped at the moment. Thanks all.
 

Big Jim M

New Member
Joined
Apr 18, 2008
Messages
2,728
Reaction score
30
Points
0
Age
86
Location
Austin
Vehicle Year
2002
Make / Model
Ford
Engine Size
4.0
Transmission
Manual
I guess I am about to throw cold water on this thread.
Hotter spark is simply put a way of SELLING a product. If the present setup fires the engine at the rpms desired NOTHING will make it better! If a golden spark will fire the fuel a bright blue spark cannot be better! Just a waste of energy.
So don't expect much from swapping over to a different system.
If your ride is running poorly simply repairing the worn parts will get it back to new again. After that nothing can be done to the spark that will be better.
Now if you plan on running lots and lots more rpm than Ford thought possible with your engine then you most likely will need more than just a different spark.
Remember the spark ONLY lights the flame, once lit the flame is on it's on!
Big Jim
 

Spott

Member
TRS Banner 2012-2015
Joined
Nov 28, 2010
Messages
925
Reaction score
21
Points
18
Location
SE Idaho
Vehicle Year
2000
Make / Model
Ford
Engine Type
4.0 V6
Transmission
Automatic
2WD / 4WD
4WD
Yes, the EEC wires go through the firewall, because the EEC is inside the cab (to the right of the passenger footwell). If you take off the front pillar cover, you'll see it.
 

Fords4Us

Member
Joined
Dec 27, 2012
Messages
51
Reaction score
2
Points
8
Location
Snohomish, WA
Vehicle Year
1983
Make / Model
Ford Ranger
Engine Size
2.8L
Transmission
Manual
Good morning and thank you both for your info. I'm learning a lot on this project.

Next stupid question: if the EEC is actually in the cab and most of my EEC wiring routes through the firewall into the cab, do I disconnect that portion of the harness at the EEC, then just snake those free wires loose through that opening in the firewall? Or do I cut them at the firewall? The latter sounds simpler but the former sounds safer (albeit a lot more work). Or is there some way to "remove the wiring harness" as listed in the conversion instructions without it being this complicated? Reading those instructions, I got the impression it would be a lot less involved than this.

Finally, back to a question from yesterday. For the six-wire TFI connection that is going away, do I actually cut off that flat six-pin TFI connector, and re-wire those loose wires into new female connectors? The instructions say which wires to connect to which, but not how to connect them. I'm inclined to get those new connectors and do a tidy job of it, but wanted to confirm.

Thanks all. When we get this thing back on the road, it'll be thanks to you folks. I'll have to get myself a TRS T-shirt and bumper sticker, and do some advertising on behalf of my support team!
 

bronco2fan

Member
U.S. Military - Veteran
Joined
Oct 2, 2010
Messages
414
Reaction score
10
Points
18
Location
Copperas Cove, TX.
Vehicle Year
1984
Make / Model
Ford
Engine Type
2.8 V6
Engine Size
2.8
Transmission
Manual
2WD / 4WD
4WD
Total Lift
3 inch body lift
Tire Size
33
When I did mine I replaced the carb, distributor, and got the harness for the wiring from a member here. You don't need any of the EEC stuff, it won't control anything anyway. Take it out and you'll be amazed at all the room you have. If you're not replacing the carb or distributor makes life harder. The write up here in the tech forum is really spot on about how to do it. Check it and make sure you have everything on hand. Took me about 5 hours to remove, install, and get her running again.
 

Fords4Us

Member
Joined
Dec 27, 2012
Messages
51
Reaction score
2
Points
8
Location
Snohomish, WA
Vehicle Year
1983
Make / Model
Ford Ranger
Engine Size
2.8L
Transmission
Manual
Good afternoon. I did find the EEC-IV just where it was supposed to be, on the passenger side pillar in the cab. Thank you for that pointer. Got that big block of wiring disconnected from the EEC box. But I'm still left with the question: how do I actually physically remove that bundle of wiring, since it goes through the firewall? I'm going to have to cut them somewhere. I could cut just the EEC wires at the EEC connector, then tug them through the firewall for removal. But there would still have to be a way to release that watertight gasket where they pass through the firewall. When I gently tug on them as-is, they don't want to move through that point. Or am I missing some really easy alternative?

For the record, I'm following the 2.8 conversion instructions in the Tech Library section, specifically here: http://www.therangerstation.com/tech_library/2_8Duraspark.shtml. Those instructions simply said to remove all the harness; they didn't mention how to remove a 1" thick bundle that passes through a watertight opening in the firewall. Sorry again if these are stupid questions. This is the biggest engine or wiring-related project I've yet attempted. Thanks for your help.
 

Spott

Member
TRS Banner 2012-2015
Joined
Nov 28, 2010
Messages
925
Reaction score
21
Points
18
Location
SE Idaho
Vehicle Year
2000
Make / Model
Ford
Engine Type
4.0 V6
Transmission
Automatic
2WD / 4WD
4WD
The simplest way is just to cut all the wires as close as you can to the firewall, on whichever side is easiest to access. Then pull each half out and proceed to disconnect everything on the engine side. This makes your harness unusable for future endeavors, but saves a whole lot of time and energy.

As a side note, I may be interested in buying that EEC connector and mass of pigtails (8" long, or so) if they're in good shape. I need to add a few pins to my harness for various functions. I also could use some of the EGR parts you're disabling or removing. Let me know if you're interested.
 

Fords4Us

Member
Joined
Dec 27, 2012
Messages
51
Reaction score
2
Points
8
Location
Snohomish, WA
Vehicle Year
1983
Make / Model
Ford Ranger
Engine Size
2.8L
Transmission
Manual
Good morning all. Some good progress here, and I learned something really interesting about that firewall pass-through for the EEC harness. That entire gasket comes out really easily. Furthermore, the gasket itself is actually quite large; large enough that the entire EEC connector and little memory chip block can come through the same opening. Which makes sense - Ford was one of the groundbreakers in terms of making the assembly process as fast and efficient as possible. I knew there had to be a way to quickly and easily get that wiring out of there, because it had to be quick and easy to put together in the factory. That gasket was the key.

To get the gasket out, there is a C-shaped flat cover plate which can be seen surrounding that gasket from the cab side. The cover plate is held on by two bolts with heads on the engine compartment side (way down where you can't reach them), and the nuts are on the cab side. Simply remove the two nuts, remove that C-shaped flat cover plate, and the entire gasket is now hanging loose in space, with the wiring harness still contained within it. You have to be careful pulling first the gasket then the EEC connector forward past the blower assembly, because there's not a lot of space there. But it can be done with a little patience and some careful shifting around of the gasket and EEC connector past the blower.

Spott, I'd be happy to sell you either the EEC connector w/ 8" pigtails, or just put the entire harness in a box and send it to you. I was thrilled yesterday to get that whole thing out of there without cutting a single wire. So now you have your choice.

More progress to be made today. Thanks again all..........
 

Spott

Member
TRS Banner 2012-2015
Joined
Nov 28, 2010
Messages
925
Reaction score
21
Points
18
Location
SE Idaho
Vehicle Year
2000
Make / Model
Ford
Engine Type
4.0 V6
Transmission
Automatic
2WD / 4WD
4WD
I sent you a PM.

How's the project progressing at this point?
 

Fords4Us

Member
Joined
Dec 27, 2012
Messages
51
Reaction score
2
Points
8
Location
Snohomish, WA
Vehicle Year
1983
Make / Model
Ford Ranger
Engine Size
2.8L
Transmission
Manual
Hey everyone. Long time no post, mostly because life and work got really busy. I had to shelve the Duraspark conversion project for awhile there. But I was finally able to get going on that again.

So now I'm ALMOST done but I've got a few remaining questions:
1. when I removed the old wiring harness, one of the things I removed was the choke heater relay, since most of those lines went to the computer. I still have the choke heater wire. Did I remove too much by taking out the heater relay, such that I should reinstall it? Or can I tie the choke heater wire into the remaining harness somewhere else?

2. I hooked up the new distributor vacuum advance line to the vacuum post which points up towards the hood, at the front and center of the 2150 carburetor, ie, facing the front of the engine bay. Is that the best place for that vacuum line, or is there a better place to put that line?

3. The new coil is specifically labeled "USE EXTERIOR RESISTOR". In the Duraspark conversion instructions in the Tech Library, there's a section which reads: "On the driver's fender well, there is another connector, square in shape and gray in color that has either a Brown wire with Pink markings or a Red wire with Light Green. These wires should be hot when the key is on. This wire needs to go to the (+) 'BAT' terminal on the ignition coil." That's the connection I used. That part of the harness goes through the firewall to the dashboard wiring immediately after that connector. The wiring schematic seems to indicate that there's already a resistor in that wiring behind the dashboard but I'd really rather not dismantle the dashboard to verify. Can anyone tell me if it's there, or do I need to go ahead and install a resistor after all?

4. What sort of testing did folks do after the conversion, prior to actually taking the truck out on the road? I have to admit, I'm a little nervous turning the key for the first time after all these changes. Excited to finally have a converted truck, but nervous that I missed something and I'm going to do damage the first time I try to fire up the old girl. Any suggestions on what to test first would be welcome. Thanks!
 

RonD

Official TRS AI
TRS Technical Advisor
Joined
Jun 2, 2012
Messages
25,363
Reaction score
8,367
Points
113
Location
canada
Vehicle Year
1994
Make / Model
Ford
Transmission
Manual
3. test the voltage at the "+" terminal on the coil with key on engine off, if there is a resistor it should read 7 to 8volts.
If it reads Battery voltage(12v) then you will need to add a Ballast Resistor.
On the firewall away from other wires is best, they do get warm.

Will it hurt to run it with 12volts at coil "+" for now?
No not at all short term, the reason for the resistor is that the coil generates way more spark than the engine needs after it has started up, so the coil will last much longer(run cooler) if it only has 8volts while engine is running.
Your starter relay on the fender should have 4 posts, 2 large, 2 small
Of the 2 smaller ones, one will be labelled "S", that's for the key switch, it activates the relay and starter motor.
The other small post is labelled "I" there should be a wire from "I" to the coils "+" terminal, so 2 wires at the "+" terminal.
The "I" post will have full battery voltage when starter motor is activated, so you get a hotter spark for starting cold engine if needed.

2. there are 2 types of vacuum on a gas engine, intake vacuum(between cylinders and throttle plate) and Ported vacuum(between air filter and throttle plate)

Intake vacuum is highest when engine is running and throttle is closed or when you are cruising along or decelerating.
Ported vacuum is opposite, it is low when throttle is close and higher when accelerating

I believe Duraspark distributors used intake vacuum but it is really up to the driver, some think intake vacuum cause too much advance.
On your carb any port above throttle plate is Ported, anything below or on the intake manifold is intake vacuum.

1. you should reinstall that relay or another one for the choke heater
Heater can draw a bit of power so you don't want it passing thru ignition switch or other switches/fuses.

Relay can be activated by coil "+" terminal wire(key on), relays are very low draw in amps, which is why they are so handy to use.
Then run a larger wires from battery(or alternator, same thing) to relay and to choke heater.
 

Fords4Us

Member
Joined
Dec 27, 2012
Messages
51
Reaction score
2
Points
8
Location
Snohomish, WA
Vehicle Year
1983
Make / Model
Ford Ranger
Engine Size
2.8L
Transmission
Manual
Good evening everyone. I'm delighted to announce that the Ranger is rolling again! I finished up the last of our wiring harness mods, and turned the key on Monday afternoon. She fired right up. I was so relieved! I did some road tests today which were generally acceptable, with some caveats which I'll describe below. But all in all, if I had to rank this first day of driving post-conversion, she's MUCH better now than she was a year ago. Thanks to everyone for all the encouragement and clarifications along the way.

A few remaining questions:
1. The only real issue I had while driving, was that we live in hilly country. She balked going uphill. I deliberately chose a road with a long stretch of incline on a gentle slope, as well as shorter lengths of sharper inclines. The shorter lengths of sharper inclines were OK, but that long stretch of gentle grade actually seemed more taxing. I didn't have any backfires or knock, but I did feel a cyclical surge or pulse of power going up the grade in 4th gear at about 45mph, and not as much power as I would have liked. Given that, I'm concerned that going up steeper, long inclines, particularly when loaded down with gear or cargo (this is after all a working farm truck), I'm going to have problems.

I have been tweaking the distributor during these first few driving days, and I had what I thought was a nice balance between power throughout the RPM range on relatively flat roads. I'm not sure how best to tweak the distributor giving the hesitation on inclines. FYI, I did use ported vacuum for the advance rather than intake vacuum, and now I'm wondering if I should use intake vacuum instead. But I'd be open to suggestions. Thanks all.

PS - I've decided I'm going to get a TRS banner to put across the windshield, to advertise to the world how it is that this old truck is still clipping along so well.........
 

Sponsored Ad


Sponsored Ad

Staff online

Members online

Member & Vendor Upgrades

For a small yearly donation, you can support this forum and receive a 'Supporting Member' banner, or become a 'Supporting Vendor' and promote your products here. Click the banner to find out how.

Truck of The Month


Shran
April Truck of The Month

Recently Featured

Want to see your truck here? Share your photos and details in the forum.

Follow TRS On Instagram

TRS Events

25th Anniversary Sponsors

Check Out The TRS Store


Sponsored Ad


Sponsored Ad

Sponsored Ad


Amazon Deals

Top