|
|
||||||||||||||
|
|
||||||||||||||
|
|
|
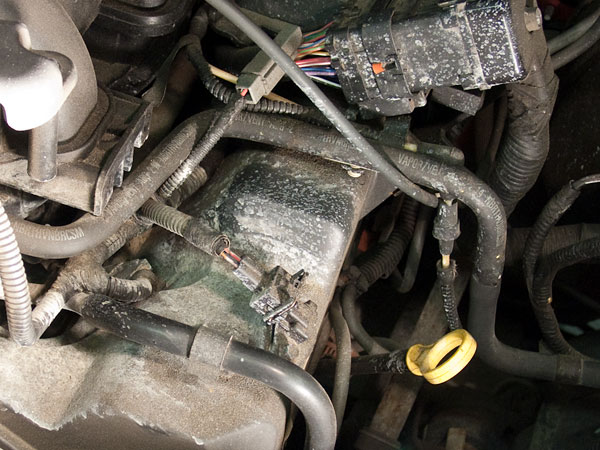
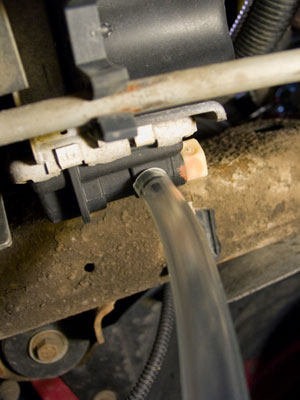
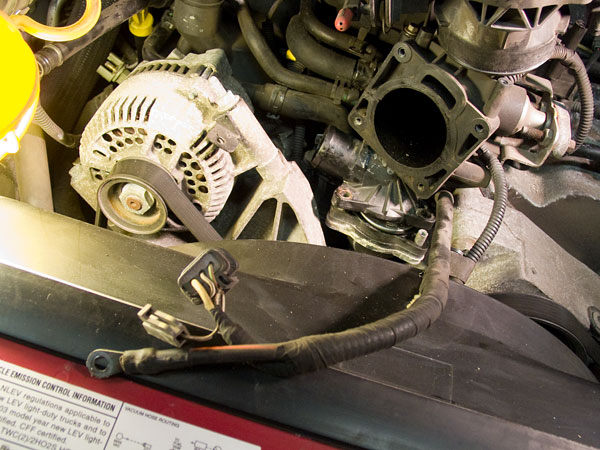
More free information by Ben Grosser IntroductionThe Ford 4.0L V6 SOHC engine is found in a number of models, including the Ford Ranger and the Ford Explorer. It was manufactured starting in 2001 (before that was an OHV version). An increasingly common complaint is a failure of the lower thermostat housing. On my 2003 Ford Ranger with 160k miles, this housing sprung a leak along the seam between its upper and lower portions. When I would push on the throttle, a stream of coolant would squirt out of the housing towards the left side of the engine bay. From there, the radiator fan would blow it all over everything (see photo below). It started out small, but got bigger over time. I finally noticed it when it was bad enough to make me start smelling burnt coolant. By this time, I was loosing about ½ quart of coolant/day and it rapidly got worse.
Unfortunately, this is not a simple gasket swap. To fix this problem you have to replace the lower thermostat housing. You won't find this part at Autozone; you'll have to go to the Ford dealer (all the parts I used are detailed below). It took me about 6 hours to do this job, but with this guide it will likely take you less. This procedure is not detailed in the Haynes manual, nor in the Ford Workshop Manual, so I decided to write it up here. What follows is a detailed step-by-step guide to performing this swap. A lot of credit goes to 03 Demon 4.0L. He did this swap before me and laid out the essentials. My brother Dan also answered lots of questions. I've added photos and other details so that those with this same problem can do the swap quickly and easily. Just Want to Replace the Thermostat?If all you need is to replace the thermostat, then this guide will help you with that too. Start with Step 1 and continue through Step 4, then jump to Step 9. Tools:
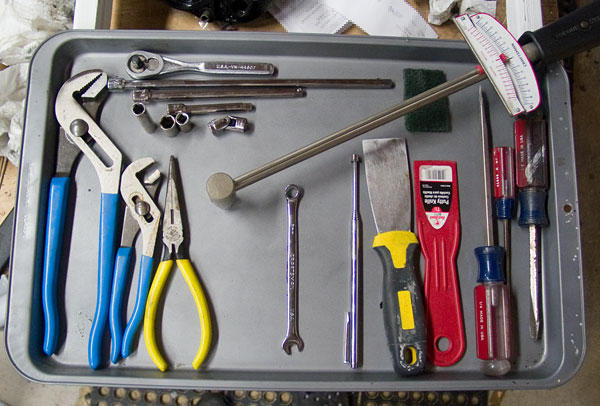
I suggest you collect all of the tools I list below. For me, none of them were optional. Most importantly, do get the 8 mm swivel socket. You can pick one up at Sears for $7.49, and it is money well spent. Pliers
Sockets
Other Tools
Supplies:
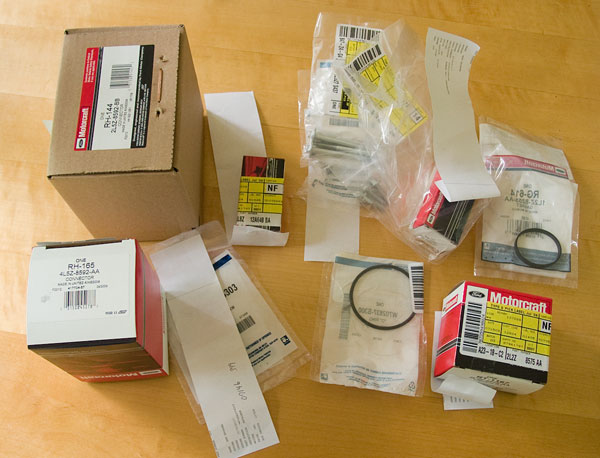
Parts List:
I ordered these parts from my local Ford dealer. The cost was about $250. You could also order them online from a number of places, but I wanted them right away. I also wanted someone to double check and make sure the parts were correct for my vehicle. The choice is yours. The parts list below will replace everything from the lower housing gasket on up. You might choose to replace less. For me, as long as I was doing the work, I wanted it all replaced. But the only parts I absolutely had to replace were the gaskets, o-rings, and lower housing. However, some have noted that the temp sensors in their vehicles don't mate up with the latest housing design. Mine looked the same, but I got new ones anyway. Your thermostat may also be working, so perhaps you could reuse that. I went with a new one. I even replaced the bolts because mine were quite rusty. I was happy with my choice, but you might make a different one.
Step 1: Disconnect Battery
You'll be messing with a number of electrical connectors, so be safe and disconnect the battery first. Remove the negative cable and set it aside. I covered the negative terminal with a spray can cap (not pictured) so nothing could touch it. Step 2: Drain Coolant
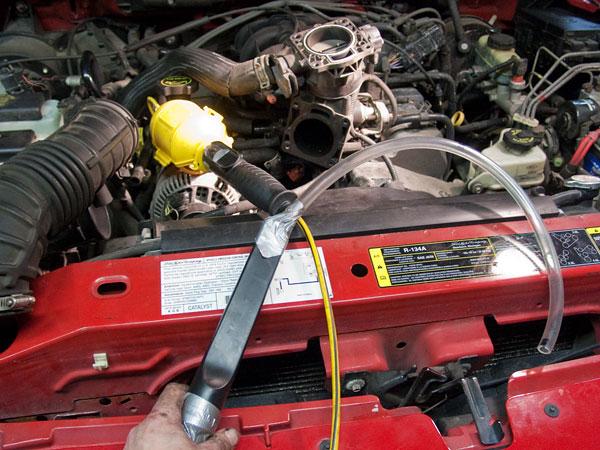
The first step is to drain the coolant. You'll need a piece of 3/8" inside diameter hose about 2' long and a drain pan of some sort. When the engine is cool, open the radiator cap. Find the drain nipple on the bottom right side of the radiator and attach the hose. Use an adjustable wrench to open up the drain. I decided to only drain as much as I had to instead of all of it. I drained about 5 quarts. Squeeze the upper radiator hose while it's draining so that it's empty when you remove it. What you're trying to do is get the coolant level below the thermostat housing. Once you've got enough close the drain. Step 3: Remove Air Intake Hose and Throttle Body Now we need to make enough room to get these parts out. It will be tight, but the next steps will make room.
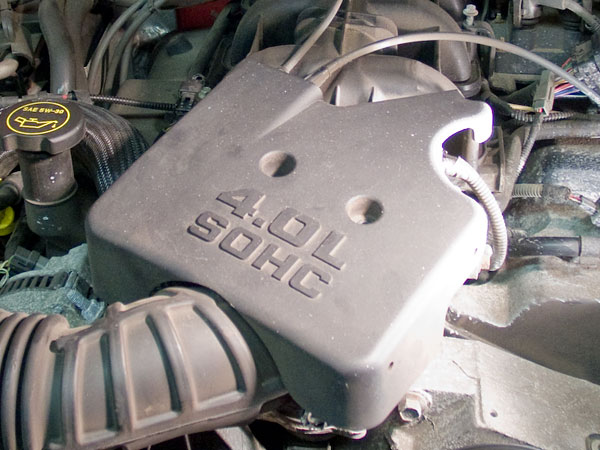
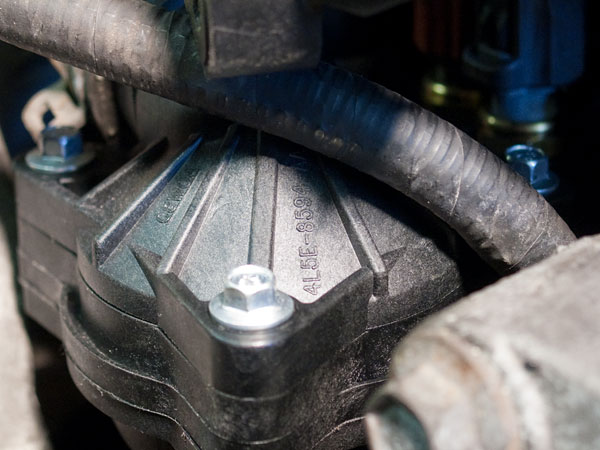
To see what you're doing, first remove the accelerator control splash shield (the cover that says "4.0L SOHC" on it). It has three bolts that hold it in.
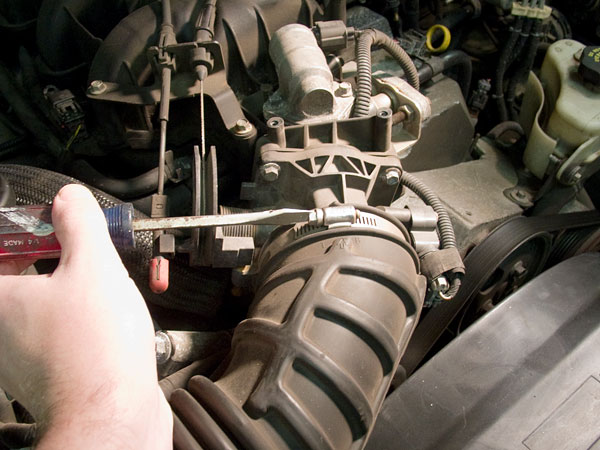
Next remove the air intake hose. There are two clamps, one on each end. Use a regular screwdriver to loosen the clamps and pull it apart from the throttle body on one end and the mass air flow sensor on the other.
Now disconnect the electrical connector on the throttle body.
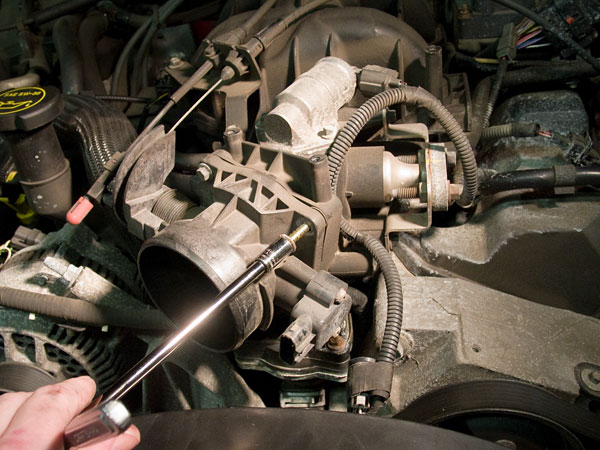
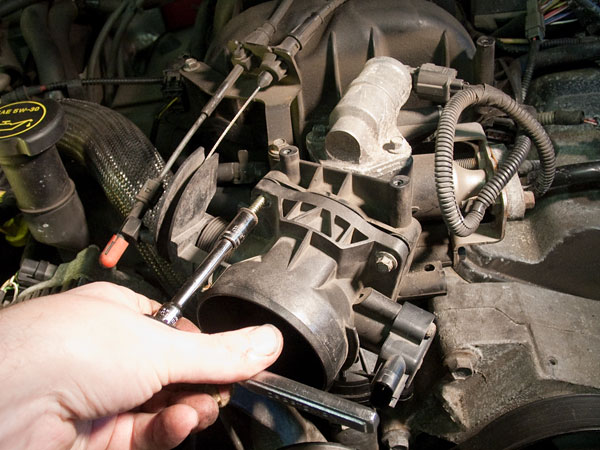
Unscrew the four bolts holding the throttle body in place, but don't disconnect the throttle or cruise cables attached to it.
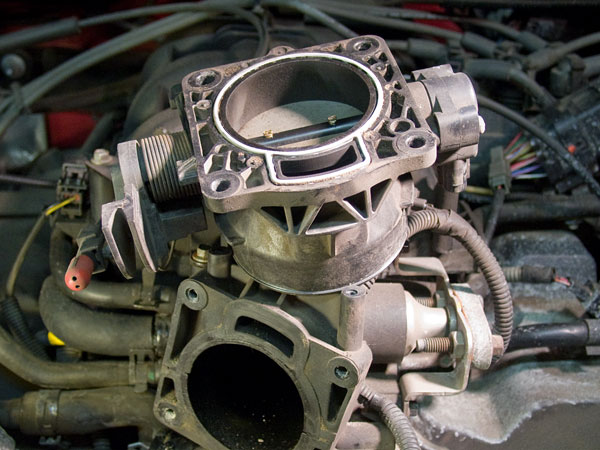
Finally, just flip the throttle body over and lay it on top of the intake. Be careful not to kink the throttle or cruise cable. Step 4: Remove Thermostat Now we need to remove the thermostat itself. First, use the channel lock pliers to loosen the squeeze clamp on the upper radiator hose (this is the big hose that wraps around the oil fill port and connects the radiator to the upper thermostat housing). Squeeze the clamp, pull it back, pull the hose off the housing, and lay it aside.
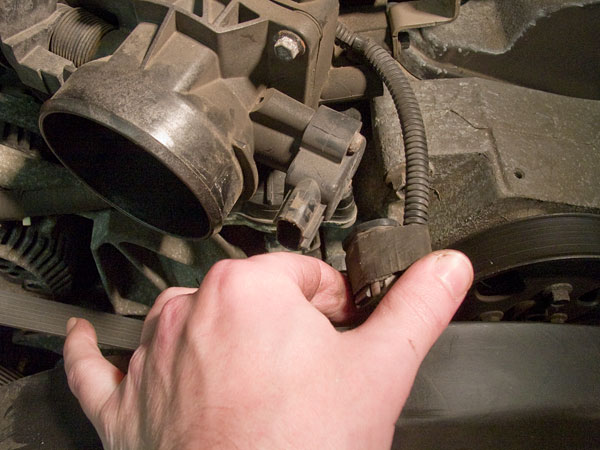
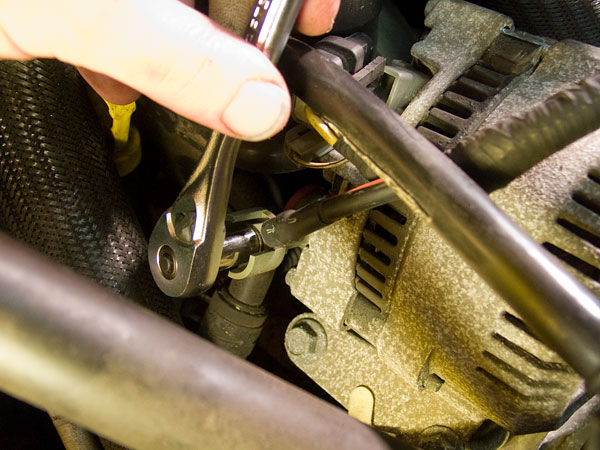
Next you need to make just a bit more room to get the upper thermostat housing off. You could probably do without this step but I found it made things much easier. Grab your 10 mm socket and follow the fat black electrical cable running over the front corner of the thermostat housing over to the alternator.
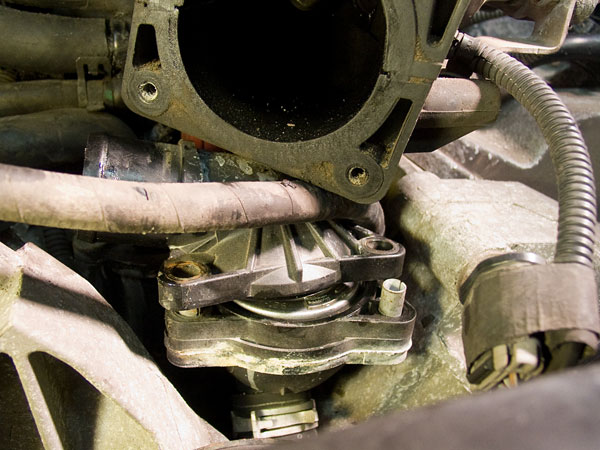
Unbolt the cable from the alternator and disconnect the other two electrical connectors. Lay it aside so that it makes as much room as possible over the thermostat housing. Using your 8 mm swivel socket and an extension, unbolt the three bolts holding the thermostat cover on. Remove the cover.
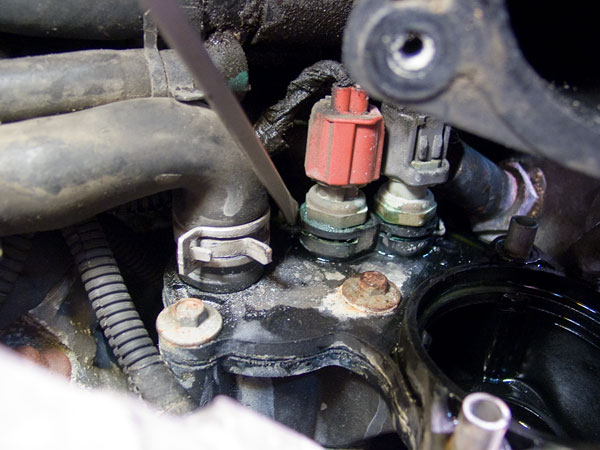
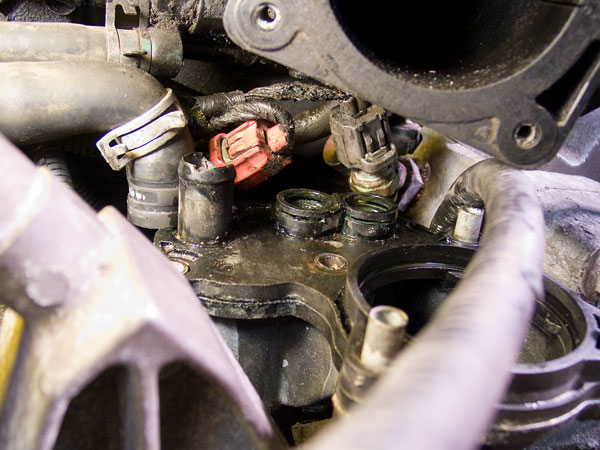
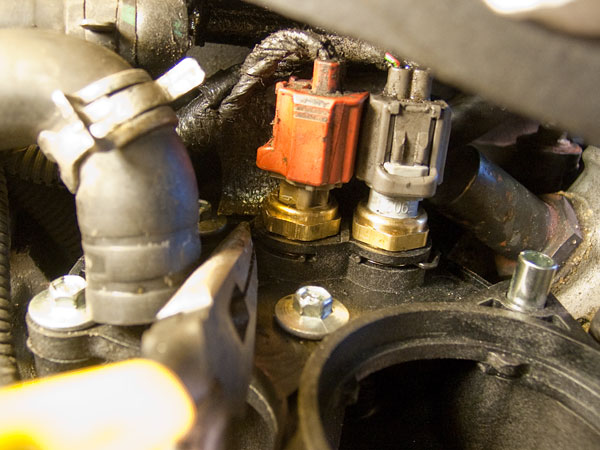
Under the cover you'll find the thermostat. There is also an o-ring around its edge. Pull both the thermostat and o-ring from the housing and set them aside. If you're only interested in replacing the thermostat, then now skip to Step 9. Step 5: Disconnect Sensors, Heater Hose, and Remove Lower Housing Bolts You almost have the housing out now. Just a few more things to do. First, use a screwdriver to pull the retaining clips on the two temp sensors. Pull them out almost all the way with the screwdriver, then grab your needle nose pliers to finish pulling them out so you don't drop them. Now loosen the sensors a bit. I found it was difficult to get them out all the way at this stage, but you should be able to pull them up some. (Despite the bolt profile on the sensor, it does not screw in. They just pull up.) This will create some space so you can see the rearmost bolt.
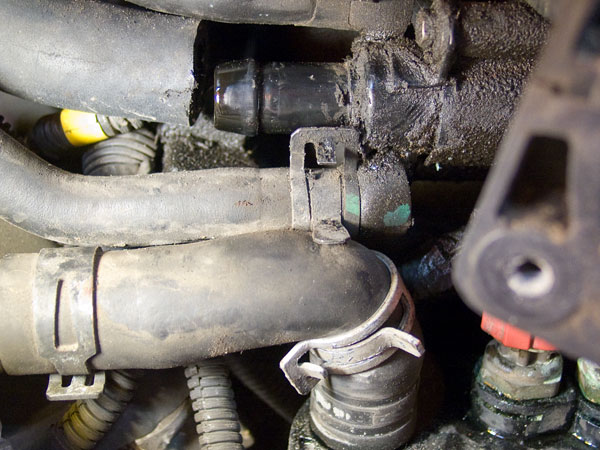
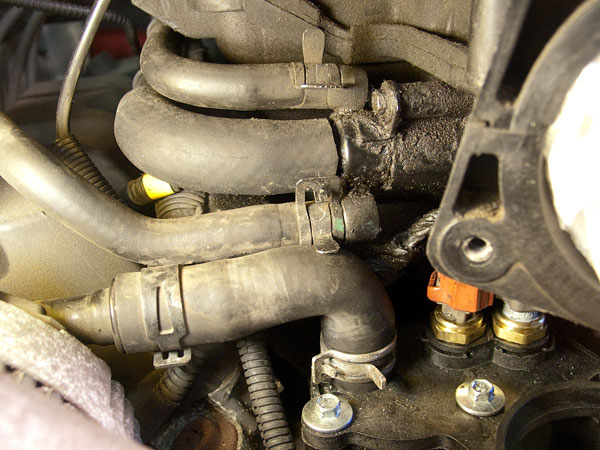
Next you need to disconnect the heater hose. To do this, first remove the vacuum hose shown disconnected below. This will make room so you can rotate the clamp upwards on the next hose below that. That will make the space you need to lift the heater hose off the housing (after you squeeze and lift the clamp on that hose of course).
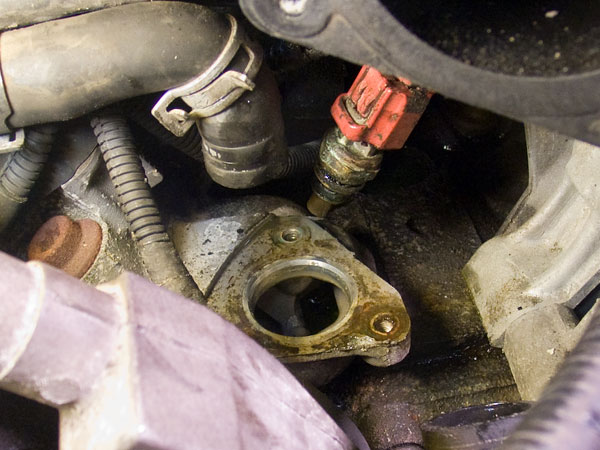
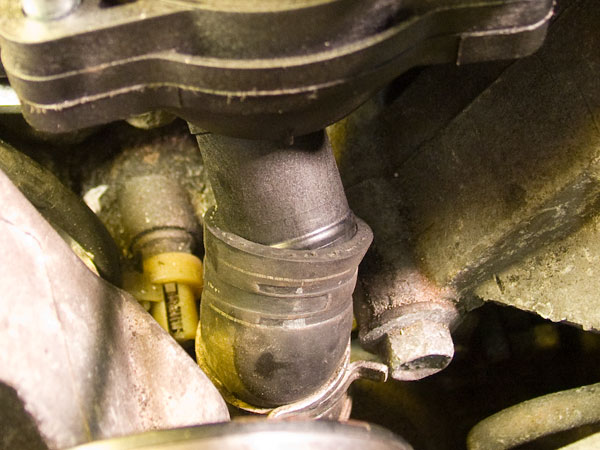
At this stage, go ahead and loosen the clamp holding the lower hose running between the bottom of the housing and the water pump. Squeeze the clamp and move it down just enough to clear the nipple. When you pull the housing up and out in a minute, it will then be able to pull out of this hose. Now you can finally remove the three bolts holding the lower housing to the engine. The front two are easy. The rearmost bolt is behind the heater hose nipple on the housing. Here's where the 8 mm swivel socket really pays for itself. You can't do this part without it. (Note the deterioration of the heater hose nipple on my lower housing. That wasn't expected.)
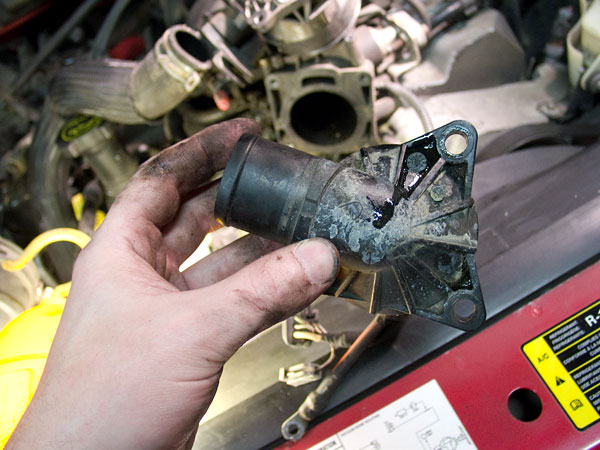
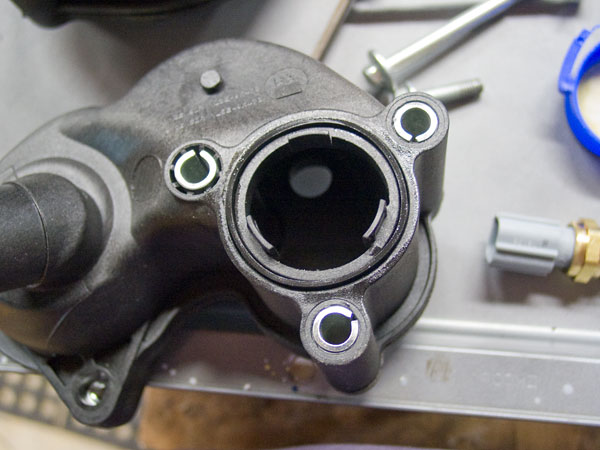
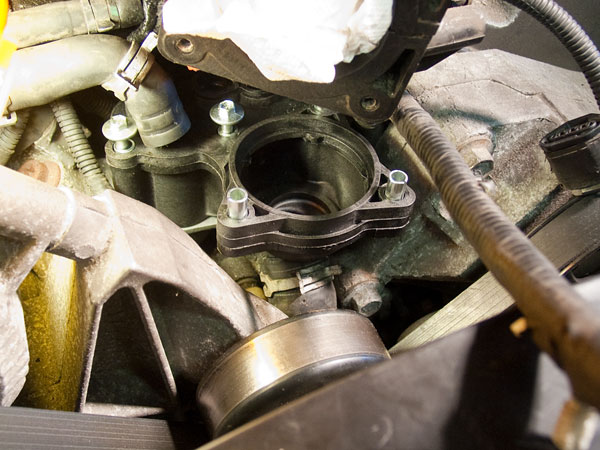
Now it's time to remove the housing. But before you do, you need to know that the housing has three tabs on its bottom side that dip into the mounting hole. In other words, DO NOT just pull the housing forward! You HAVE to lift it straight up a bit (about 1/8" to 1/4"), then pull it forward. Here's what the bottom (of my new one) looks like.
If you do pull forward and not up, you'll break those tabs off and they'll end up in the engine (ask me how I know!). I will say that I think the tabs on my old housing were very weak already so they were prone to breakage, but that's all the more reason to be careful. Once you have the housing lifted up a bit to clear the tabs, you can rotate it a little so you can pull the sensors all the way out. Then you can coax the lower nipple out of that lower hose. From there you just need to carefully and patiently maneuver the part out of the space.
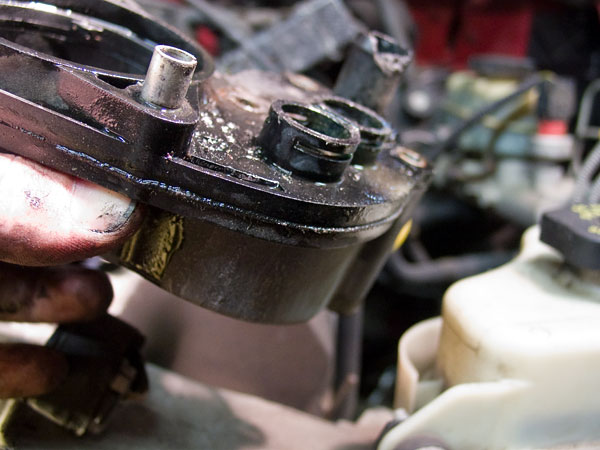
Mine had failed somewhere along that rough edge, in the area behind the sensor ports. Every time I pushed on the throttle, a stream of liquid would come squirting out of there.
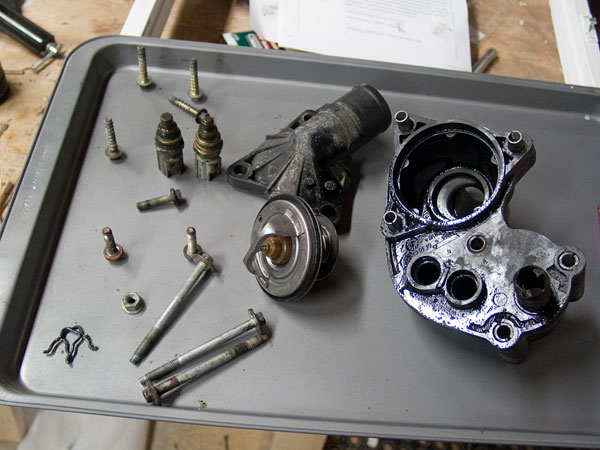
Here are all the parts you've removed. Now it's time to take a break! You've done most of the hard work. I found getting the new parts in to be easier than getting the old parts out. Step 6: Clean Up The Mess Now you can inspect the mess left by your coolant leak. Get your flashlight and shine it under the intake manifold. On mine coolant was pooled in all the little nooks and crannies. There was corrosion all over and a kind of coolant-corrosion sludge on things. Demon suggested I use my hose and spray off the engine at this point. I probably should have followed his suggestion, but when I was at this point it was late, I was in the garage, and this would have meant waiting until morning. So instead I grabbed my shopvac and some rubber hose and made up an attachment to slip under the intake manifold and suck up as much of that gunk as I could.
Use your flashlight and the shopvac to get as much of the gunk up as you can. Also, if you're like me, and the lower tabs on your housing broke off into the mounting hole, you can stick it in there and suck those up too.
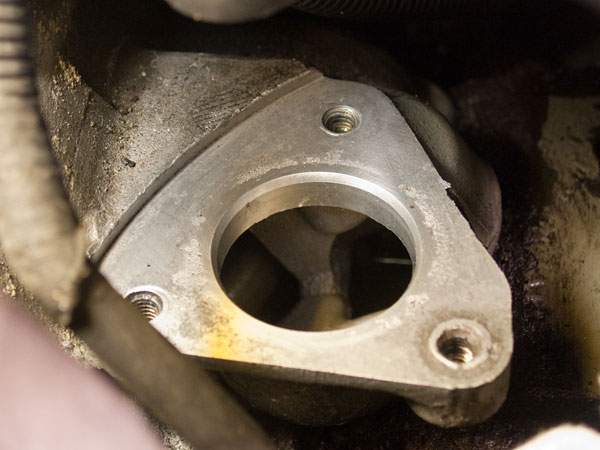
Next turn your attention to the mounting hole. Mine was very dirty with sludge and corrosion stuck on it. I did most of my cleaning with a small square of a Scotch Brite scrubbing pad and WD-40. That got a lot of it up. I also had to use a putty knife to get up some of the worst stuff. Be very careful if using a putty knife! You don't want to score the mounting surface at all. When I was done it looked like this.
Once clean I found that there was some pitting on the mounting surface directly underneath where the gasket sits. I was worried it would cause a problem but it didn't matter at all. If you're interested in flushing out your coolant system then now is a good time to do that too. I didn't, but if you want to, having the thermostat out of the way will make it a little easier than normal. Step 7: Install New Lower Thermostat Housing Now you're ready to install the new parts. Most of the work comes now, with the installation of the lower thermostat housing. To start, find the lower thermostat housing gasket. Wet your finger with a bit of fresh coolant, and wipe it on the gasket. Then install the gasket into the slot on the underside of the housing.
Next, flip the housing over and slip in the rearmost bolt. You have to put this in now because once the housing is in place there isn't enough clearance to get it in the hole. It's also easier to install the front bolts now too. It's not impossible to get them in later, but that one under the intake manifold is a little difficult, so save yourself the trouble. Before you can set the housing in place and tighten the bolts, you have to get it into the lower hose that leads to the water pump. You might need to lower the squeeze clamp a little bit more to make room (I did). Slip the housing nipple into the hose all the way and then use your needle nose and then large channel lock pliers to reinstall the clamp.
As you're slipping that lower hose nipple into place, you need to remember to be conscious of those three tabs on the bottom of the housing where it meets the engine. Make sure you lower it into place instead of pushing it into place so that those tabs don't get damaged!
Now that you've got it set into place, you can tighten the bolts. First, twist them with your fingers as much as you can. Then, using your 8 mm swivel socket and a long extension, tighten each bolt a bit in succession. Go in a circle, tightening each bolt a little and then moving on to the next one. You want to tighten these to 10 nm (89 in. lbs.). In other words, not too much! Don't crack your new housing. Step 8: Install New Sensors and Reattach Upper Hoses Wet the o-rings on each of the new sensors with a bit of fresh coolant. Then grab the sensor with the light grey housing (part # 3L8Z-12A648-BA) and slip it into the grey connector until it snaps into place. Now insert this connector into its mounting hole (the rightmost hole when looking straight on it). The clearance is tight, but it will fit. Angle it as much as you can until you can't anymore and then shift it straight up and down into the hole. Now repeat with the other sensor (part # 3F1Z-10884-AA) and the red connector. Then, using your needle nose pliers, insert new retaining clips to hold the sensors in place. Demon has a tip about these little retaining clips. Tie a piece of fishing line to them before you try to insert them. That way, if they pop off before you get them seated (like they did for him), then you won't lose them. I didn't have any problem when I inserted the, but no question they could be hard to find if you lost your grip on them.
Now you need to reinstall the upper hoses. Slip the heater hose back into place on the lower housing nipple. Squeeze the clamp back into place. Then rotate the squeeze clamp on the next hose up a bit to make room for the vacuum hose above that to slip into place. Slip the final vacuum hose into place. You probably have a clamp on this hose but I don't. Reinstall your clamp.
Step 9: Install New Thermostat Find the thermostat o-ring and the new thermostat. Wet the o-ring with some fresh coolant. Slip the o-ring onto the thermostat from the top. Then slip the thermostat (with its o-ring) into place in the lower housing. I oriented mine the same as the old one that came out, but I don't think it makes a difference.
Once in place, insert the upper housing thermostat cover's nipple into the upper radiator hose. Don't put the clamp in place yet, though (in case you need to twist the housing a bit). Then lower the cover down onto the lower housing. It has to line up just right. Be patient, and carefully lower it down until it's down all the way.
Insert the bolts into place and tighten using the 8mm swivel socket to 10 nm (89 in. lbs.). Remember to tighten each one a bit at a time and go in a circle. When done, move the upper radiator hose squeeze clamp back into place. Step 10: Reconnect Alternator Cable, Throttle Body, Air Intake Hose, and Battery Reconnect the alternator cable. Using your 10 mm socket you can reconnect the lower connector, then push in the other two connectors until they seat fully.
Reinstall the throttle body with the four bolts you removed in Step 3 using an 8 mm socket.
Don't forget to reconnect the electrical connector to the throttle body.
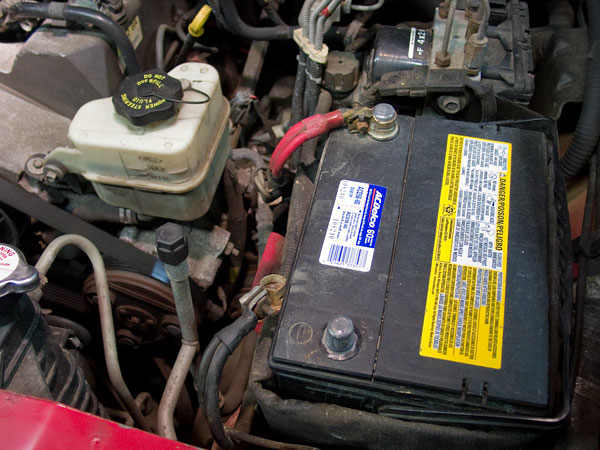
Reinstall the air intake hose. Slip it into place and tighten the clamps on both ends. Make sure to reconnect the crankcase ventilation tube (the hard tube that tees off and goes back towards the oil fill tube).
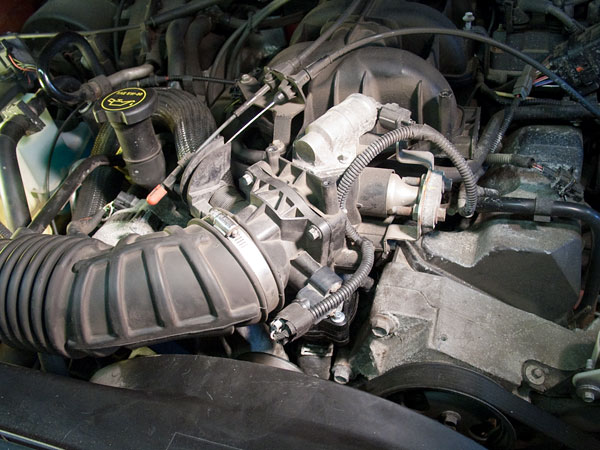
Reconnect the negative cable to the battery's negative terminal. If the terminals or connectors are dirty, now's a good time to clean them up (pickup a battery terminal cleaner at the auto parts store for a couple bucks. The hardest work is done! The engine is all back together (except for the "4.0L SOHC" cover, but don't put this back on yet), and should look like the photo above. Step 11: Refill Coolant System Now you need to refill the coolant system. If the coolant still looks good, you can reuse what you took out. Remove the radiator cap, get a funnel, and pour it in. If you're using new coolant, use a 50/50 coolant/water mix and fill it up through the radiator cap hole. Fill it right up to the top. Then add coolant to the coolant expansion tank up to the cold fill line. Step 12: Check for Leaks and Adjust Coolant Level Start the truck up and watch for leaks. Get a good flashlight and look around the base of the lower housing. Then check all other connections to the housing (heater hose, upper radiator hose, sensors). Turn the throttle faster and check again. Look underneath to see if you see any coolant dripping. Don't be confused by coolant that might already be there from your previous leak (I had coolant all over everything at this point). Turn the heater temperature to maximum and the fan speed to maximum. Direct the air to come out of the upper (A/C) vents. Then take the truck for a spin and get it up to operating temperature. Feel for hot air coming from the vents. Watch your water temperature gauge to make sure it rises to midway but not beyond. If you have hot air coming from the vents and the temp gauge looks good, then return home, but leave the engine idling and open the hood. Feel the upper radiator hose to see if it's hot to the touch. If the hose is hot, then everything is good. If the heater air isn't hot, the temp gauge doesn't come up (or goes too high), or the upper hose isn't hot, then you probably don't have enough coolant in the system. Shut it down and let it cool, and then fill it up again. Even if everything looks good, you'll need to continue adding coolant to the system over the next couple days. Each morning before driving, and when the engine is cool, check the level and add coolant to the radiator and coolant expansion tank. It is normal for it to take more over the next several uses as it bleeds the air out of the system. It took me about two days until it was finally full when I checked it. Remember to only add coolant when it is cool! Step 13: Enjoy! Keep an eye on your water temperature gauge over the next couple days. Continue to watch for leaks too. Treat yourself to a car wash with an underbody spray to clean off all that old coolant that got splashed all over everything. Remember that it may take a few days for any coolant you don't catch to burn off or evaporate, so you may still smell it for a while. That gross smell went away for me in about three days. Once you're sure you have no leaks, reinstall the accelerator control splash shield (the "4.0L SOHC" cover). I don't know how much this would have cost at the mechanic, but it wouldn't be cheap. Congratulate yourself on saving the money, and knowing that the job was done right! Most of all, enjoy a leak free engine! About Me My name is Ben Grosser. I like to do things myself whenever I can. I also like to share information like this with others so that they can learn from my experience. One of my most popular pages is a site on how to build your own artist's easel. I have benefited from so many people on the internet over the years who have taken the time to help others for free. I do this to pass on that help. If you have any questions, or any suggestions to add, please . I would also love to hear from you if you use this information and it helps you out. This page was written by Ben Grosser. All content and photos are © 2009 and may not be used without permission. however, if you ask nicely, I am likely to say yes Visit www.bengrosser.com Used by The Ranger Station after being contributed by Ben Grosser
|
|
|